 It's the holiday weekend and it's time to celebrate! My kids LOVE ice cream and they especially love ice cream cones. They're sweet, delicious and fun to eat, there's no wonder they're so good. But if you have little ones you know how messy ice cream can be when it melts away faster than they can eat them. The ice cream starts dripping down the sides as a parent nearby is urgently encouraging the child to lick the melting treat and lick those drips! before the ice cream comes flooding down the side of the cone. One drip at a time and then they're covered. You've seen it, I'm sure, they're all dressed up for a party and they get their adorable little outfits all covered in ice cream! These cute cannoli inspired vanilla cones are delicious and taste like soft serve vanilla ice cream from the ice cream shop. Seriously! Try them! I don't add a lot of sugar, I find that by the time you put the ricotta in a sugar cone and add sprinkles on top that the amount of sweetness is perfect. My boys gobbled these up in a flash! But if you have a real sweet tooth taste the cannoli mixture and add more sugar as you need, but trust me, you won't need a lot! These vanilla cones are easy to whip up and perfect for serving to a crowd. You can prep the ricotta ahead of time and keep it in a covered bowl in the fridge then put them together right before serving. I wouldn't put them together ahead of time because the cones may get soggy and the colors from the sprinkles may start to melt into the ricotta.... and no one wants a soggy ice cream cone! So I'm guessing that by now you know what I'm talking about and that you probably have one of those friends whose darling children are always perfectly dressed in the cutest little outfits. Help her out this holiday weekend and serve these cones. I promise, Mama will say yes to these cannoli vanilla cones! INGREDIENTS - 2 cups of ricotta cheese - dash of pure vanilla extract - 3 tbsp of powdered sugar/icing sugar - coloured sprinkles, or other toppings of your choice - sugar cones DIRECTIONS 1. In a bow mix together ricotta cheese, vanilla and sugar until well mixed and a bit fluffy - taste and add more sugar if desired 2. Spoon cheese mixture into cones and add sprinkles! 3. Enjoy!
2 Comments
 Score: 1 for Mom, 1 for the kids. That's how I feel about this chicken salad pita recipe! I'm fully aware of the benefits of eating a well balanced diet and I really strive for my family to be as healthy as we can be. Now that doesn't mean that I'm a health fanatic, what I mean is that when you eat a balanced diet full of vitamins, minerals and fibre there's room for some treats too. This tropical inspired chicken salad has delicious pineapple and a secret ingredient too, chickpeas. Yes, you read that right - chickpeas, also popularly known as garbanzo beans. The chickpeas blend right into the dressing, hidden between bites of pineapple and chicken. I think it's the fact that these little chick peas are so sneaky, they're similar in color to the chicken and pineapple that the kids don't even see or taste them. It's a sneaky dose of goodness coming their way! To make these sandwiches a little more fun and easier to eat I scoop the chicken salad into little pita pockets. And there's extra fibre points for you if you use whole wheat pita shells. Score! This recipe calls for canned pineapple because it's what most people have readily on hand. But you can use fresh pineapple too! Fresh pineapple is usually sweeter and juicier than canned pineapple so you can easily substitute it. Because it's juicier you won't need the 2 tbsp of pineapple juice, just use the fresh pineapple and it will be delicious! Chicken salad is the ultimate use for leftover chicken. Make this salad in the morning when you're puttering around in the kitchen and it'll be ready to make sandwiches at lunch time! INGREDIENTS - 1 cup of cooked chicken, shredded by hand - alternatively you can chop it up - 1 cup chickpeas rinsed and drained - 1/2 cup chopped pineapple - 1 carrot shredded - 1 green onion chopped fine - 1/2 cup mayonnaise - 2 tbsp vinegar - 2 tbsp pineapple juice from the can of pineapple - pinch of kosher salt - pinch of ground black pepper - lettuce - small pita bread pockets DIRECTIONS 1. Take the pineapple from the can and keep some of the pineapple juice aside 2. In a bowl whisk together the mayonnaise, vinegar, pineapple juice, and salt and pepper 3. In another bowl stir the chicken, chick peas, chopped pineapple, grated carrots and chopped green onion all together 4. Add some of the dressing to the chick pea chicken mix and stir. Add more dressing until it suits your taste, some like a really saucy chicken salad while others prefer less dressing 5. Cover and refrigerate until ready to serve 6. Put together in pita pockets with lettuce and enjoy! Makes 3 cups of chicken salad  Aaahhhh..... the lazy crazy days of summer! You know those days, the ones when you spend most of your waking hours outside enjoying the glorious weather. A little bit of gardining, playing in the sandbox with the kids, lounging with a book under a shady tree, sipping sangria on the patio with your girlfriends.... ahhh, heaven! Well, if you're anything like me, I dread coming in from the sunshine on a beautiful summer day to make lunch for everyone. Don't get me wrong, I love making a yummy lunch, but I hate fussing about the kitchen while I'm missing out on being outside. So, I'm going to let you in on a little tip! While you're busy in the kitchen making your morning coffee and puttering around anyway, whip up this chicken salad. It will save you tons of time later on! Any leftover chicken from last night's dinner is perfect for this chicken salad. Just chop, toss and stir - that's it! The tomato and basil flavours in this chicken salad are a nod to summer. The radish and red onion give it a bit of crunch and a bit of flavour zing. It's loaded with veggies which are oh-so-good for you and we all know we need to get more servings of fresh veggies in our diet each day. Besides, these veggies are delicious anyway! Okay, so back to the recipe... once it's ready cover it up and pop it in the fridge until you're ready for lunch. It hardly gets any easier than this! Just grab the bowl, a serving spoon, some lettuce and a bag of rustic whole grain buns and lunch is served! Letting the chicken salad sit in the fridge for a few hours helps let all of the flavours meld together.... kinda like that sangria I was talking about earlier! So really, it's like this lunch was just made for glorious summer days! Update: I'm alaways excited when one of my recipe blogs is featured on the feedfeed's website! This recipe was featured in their Sandwich love! feed - check it out! https://thefeedfeed.com/lovegoodfoodblog/rustic-chicken-salad-and-basil-sandwiches INGREDIENTS - 1 cup of shredded chicken - 1/4 cup of mayonnaise - 1/4 cup of sour cream - cherry tomatoes, quartered - 1 radish, chopped - slice of red onion, diced - basil leaves, chopped - chives, chooped - dash of kosher salt - dash of black pepper - sprinkle of sugar DIRECTIONS 1. In a bowl combine mayonnaise, sour cream, pepper, salt and sugar and stir 2. Add shredded chicken, tomatoes, radish, onion, basil, and chives and stir until all mixed 3. Cover chicken salad and refrigerate 4. To prepare sandwiches I like to add a layer of lettuce on the bottom and load on the chicken salad * I love using a rustic bun like these multigrain buns I found at the bakery in my local supermarket  I think I have just found my go-to salad for the summer!!! I just love these gorgeous thin radish and cucumber slices, and I don't know why, but they just taste better sliced uber thin like this. I love the way the light hits each slice and brightens it up, it's just beautiful, like each slice is in the spotlight. I have totally been on a radish kick this spring. I love the earthy taste and the fiery little kick in each bite. I love the bright white centre with it's fine red border. I have been tossing these little gems in salads, on sandwiches and wraps, and even in black bean tacos with red radish slaw all spring. They are definitely continuing into my summer obsession too! So I can't help but love this gorgeous cucumber and radish salad with its delicate papery thin slices. This salad looks classic and sophisticated yet it's so simple and you can make it in a snap. The only tricky part may be getting the slices nice and thin! I think this salad is a perfect choice for special events. I would confidently serve this salad at wedding shower or dinner party or at a family brunch. It's paired with a light creamy honey dressing, no strong flavours are needed to compete with the radishes! The honey is mild and adds a slight sweetness while the vinegar brightens it up. I'm sure it will be a crowd pleaser. Yup, this is going to be my go-to side salad this summer! INGREDIENTS - 1 bunch of radiahes - 1 cucumber - 1/2 cup sour cream - 2 tbsp white vinegar - 2 tbsp honey - pinch of salt - freshly ground black pepper - basil leaves DIRECTIONS 1. Finely slice cucumber and radiahes with a sharp knife or mandolin 2. In a bowl whisk together the sour cream, vinegar, honey, and salt and pepper until mixed 3. Serve cucumber and radish slices with dressing drizzled on top and garnish with chopped basil leaves serves 8 side salads  Okay, so you probably don't want to start baking salmon first thing in the morning but the next time you have leftover salmon from dinner the night before treat yourself to this decadent salmon cream cheese and chives omelet! So yummy and it's a great way to get your brain food for the day (hello omega 3s!). RECIPE COMING SOON!  Okay, okay.... I'll admit, I don't bake whole a lot. The main reason is that I have absolutely no willpower to keep myself from eating a dozen yummy freshly baked cookies in one sitting. But my family deserves some love from me in the form of an ooey gooey chocolate chip cookie once in awhile so they will be so excited to see these cookies today! These little delights are made with half of the brown sugar and half of the chocolate chips that most recipes call for and has half a cup of freshly grated coconut instead. I also love to use 1 tsp of kosher salt instead of table salt. The cookies aren't salty but they have a great hit of salt that is the bomb with the sweetness of the chocolate chip in every bite - Mmm mmmm! INGREDIENTS - 1/2 cup of white sugar - 1/2 cup of brown sugar - 1 cup of softened butter - 2 eggs - 1 tsp vanilla extract - 3 cups of all-purpose flour - 1 tsp baking soda - 1 tsp kosher salt - 1 cup chocolate chips - 1/2 cup shredded coconut DIRECTIONS 1. Preheat the oven to 350 degrees F 2. Cream together in a bowl or mixer the brown and white sugar with the butter until fluffy 3. Add the eggs and vanilla and mix until just blended - tip: crack one egg at a time in a small bowl and add to the mixing bowl to prevent egg shells from getting into the mix 4. In a medium sized bowl mix together the flour, baking soda and salt 5. Add the flour mix into the wet ingredients and mix until the dry ingredients are moistened 6. Stir in by hand, or on the lowest setting, the chocolate chips and coconut 7. Spoon out the cookie dough onto ungreased cookie sheets and bake until the edges are browning, about 10-12 minutes 8. Put the cookies on wire racks to cool! Haha, this way you'll get to indulge in your first cookie sooner! It also keeps the cookies from continuing to bake on the hot cookie sheet 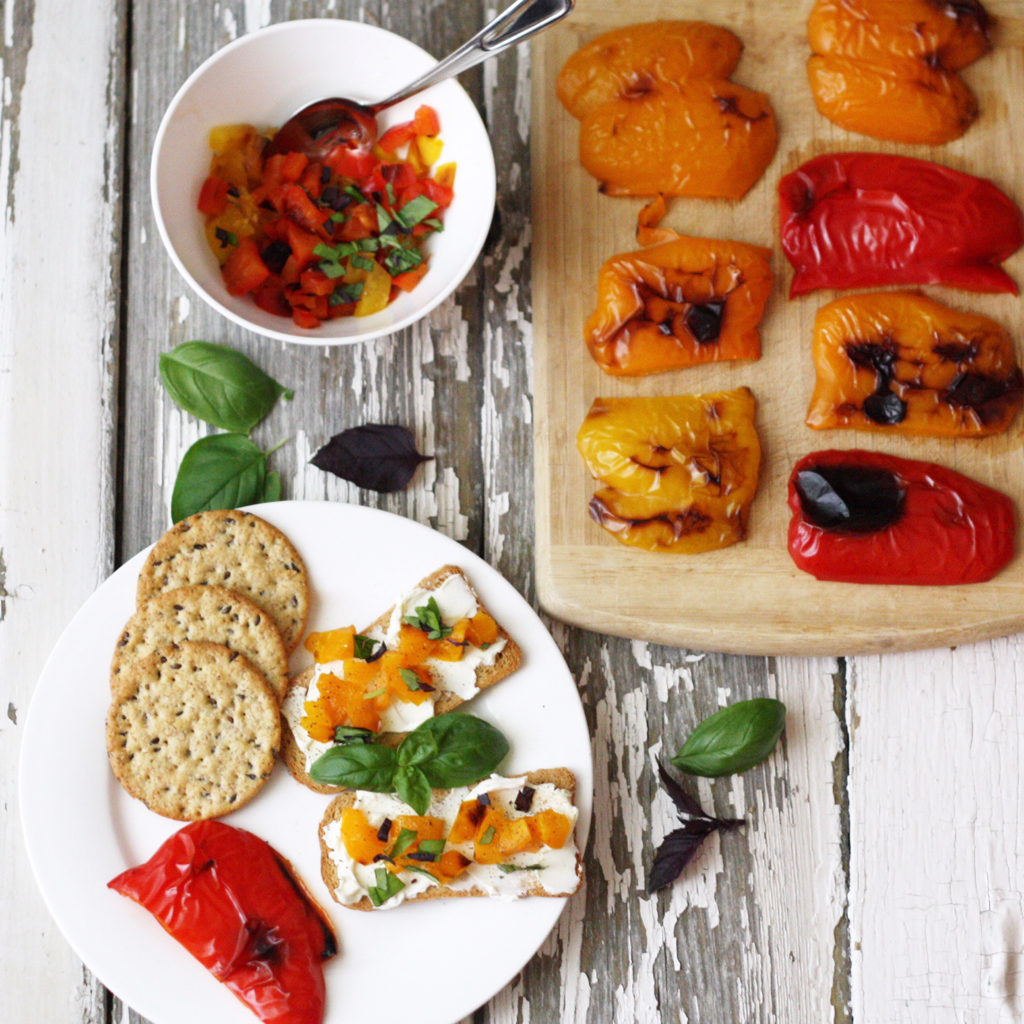 I was at the grocery store and there was a sale on bell peppers, and I don't just mean the green peppers. The red, orange and yellow bell peppers... were ALL on sale! And get this... the green peppers weren't included in the sale! The sale price was 10 peppers for $10! I kid you not, this was the sale of the year! With produce prices jumping sky-high I have been paying close to $2 per pepper these days so I was ecstatic to find such a deal. I grabbed the biggest and prettiest peppers in the pile and, totally smiling and satisfied, finished up my shopping. I got home and started unpacking my peppers wondering what I was going to do with them all. I usually only buy three or four at a time, and I savour every one of them, like little golden nuggets. But with 10 peppers - wow, my fridge was overflowing! Think... think.... think.... I know, roasted peppers! That's what I'll make, gorgeous roasted red, yellow and orange peppers. 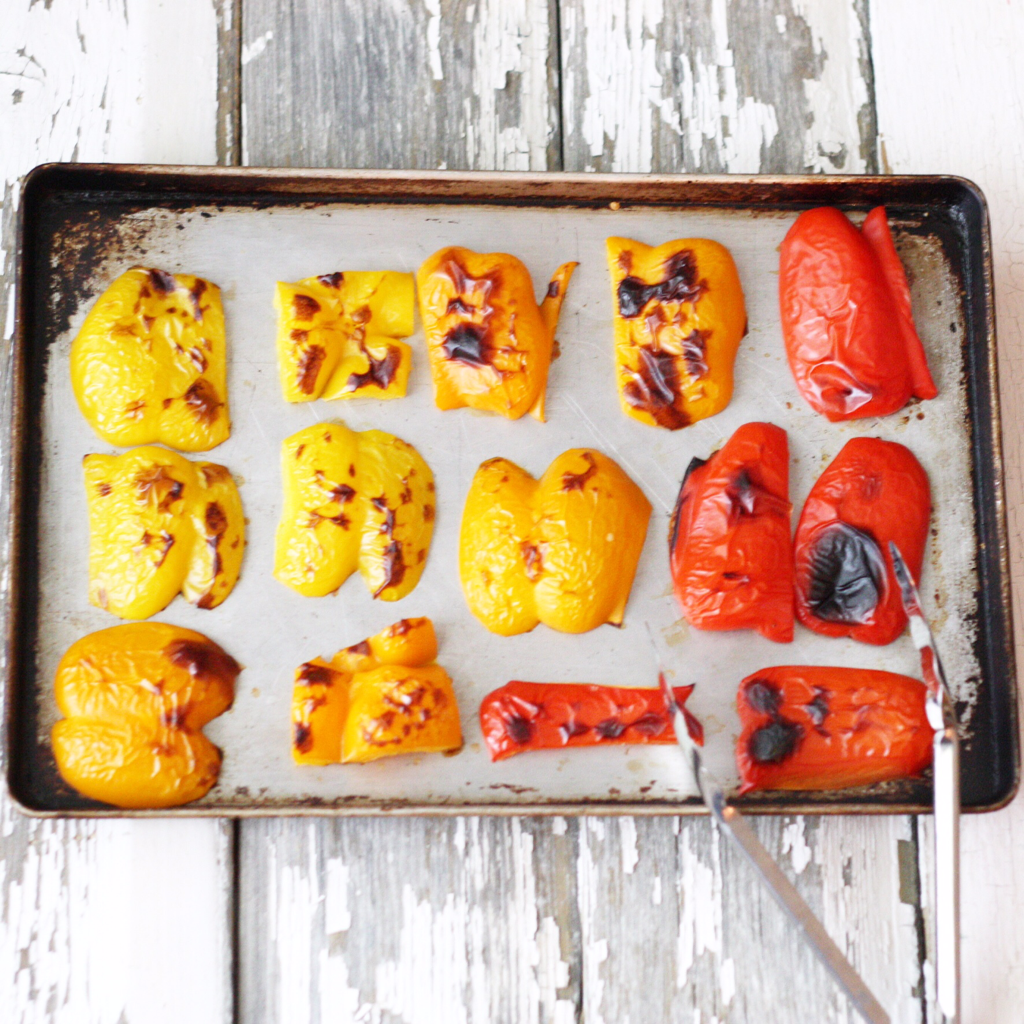 Roasting your own peppers is easy as 1-2-3. They're gorgeous and so versatile. You can use them as condiments, blend them into sauces, use them as sandwich fillers, put them on a charcuterie board, make them into soups and so much more! There are actually many methods to roast peppers but my favourite is roasting them on a pan in the oven. I like this method because you can do lots of peppers all at once and it only takes minutes. Honestly, it takes minimal effort and skill - you'll look like a pro and it's so rewarding! INGREDIENTS - bell peppers, colour and as many as you choose is up to you - assorted crackers - cream cheese - purple and green basil DIRECTIONS 1. Preheat your oven to 350F 2. Cut peppers into quarters and remove stem and seeds 3. Place peppers skin-side up on the baking sheet 4. Bake in the oven for approximately 15 minutes or until the peppers have reached the desired amount of char - don't worry if they get too black, you will peel that off anyway 5. Take the peppers from the oven and place them in a pile on a flat surface like a large cutting board and invert a large bowl over the peppers until they cool, about 15 minutes (this will help trap the moisture to make peeling the skin off easier) 6. Peel the charred skin off the peppers and discard, don't worry if you don't get it all off, I like to leave some of the colour on 7. Use the peppers right away or store in an airtight container in the fridge for a few days.... trust me, they'll get eaten before they go bad! 8. Chop some peppers and basil and and spread them on cream cheese and crackers - super easy healthy snack!  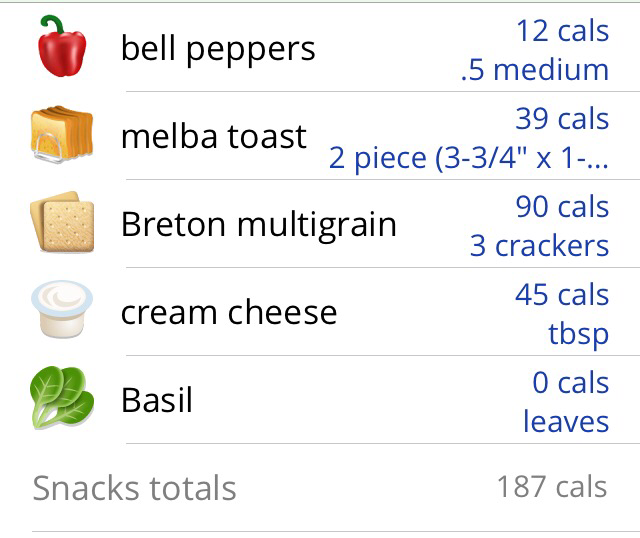  We just moved to an acreage last fall and I was blown away this spring by the abundance of rhubarb from the rhubarb patch in our garden. It's a wonder I haven't been making rhubarb pies, rhubarb compote, rhubarb ice cream and rhubarb everything all spring! The truth is that the garden and the acreage is taking up a fair bit of my spare time. That's okay. It's a labour of love. There will be more time this summer for more rhubarb recipes! So the other day after a busy morning in the garden I was craving a cool drink, something crisp and refreshing. And the rhubarb patch was staring right at me - Ahhhh! Rhubarb Coolers! So I grabbed some fresh stalks of rhubarb and headed to the kitchen. Once I got going I couldn't believe the wonderful aroma coming from the pot on the stove when the rhubarb and orange peel were cooking. The smell wafted through the kitchen and throughout the whole house. Mmmmmm.... I could hardly wait for these wonderful rhubarb coolers to be ready! If you can get yourself a bit organized early on in the day this gorgeous cooler will be ready for 5 o'clock drinks! The prep time itself isn't daunting, it's just that the rhubarb concentrate needs time to chill in the fridge before drinking. Just think of adding an ice cube and it melting and diluting your drink right away.... hmmmm.... ya, it's best to wait until it chills in the fridge!  This recipe combines rhubarb, and fresh orange juice and lemon juice. It's a wonderful summer flavour combination. You then mix it with a simple syrup to make a rhubarb concentrate. This is great because you can make a big batch of it at one time, perfect for parties, weeknight entertaining, or just having it on hand when you feel like a cool refreshing drink! Simply pour some of the rhubarb concentrate into a glass, add ice cubes, add an ounce of vodka or rum (optional) and top off with sparkling water.... soda water will do too in a pinch! The best part about keeping the rhubarb concentrate in a pitcher in the fridge is that everyone can make it to their taste. I prefer mine with lots of sparkling water whereas my husband likes it a bit sweeter. And by not pouring in the alcohol in right away you can serve this as a non-alcoholic beverage to the kiddies and those who prefer to have a non-alcoholic drink! But if you're making this for a crowd grab a big punch bowl, you'll need it! I promise you'll be making this all summer! Oh - and what I forgot to tell you earlier was that while I was in the garden I came across this little tree frog just chilling in the rhubarb patch! 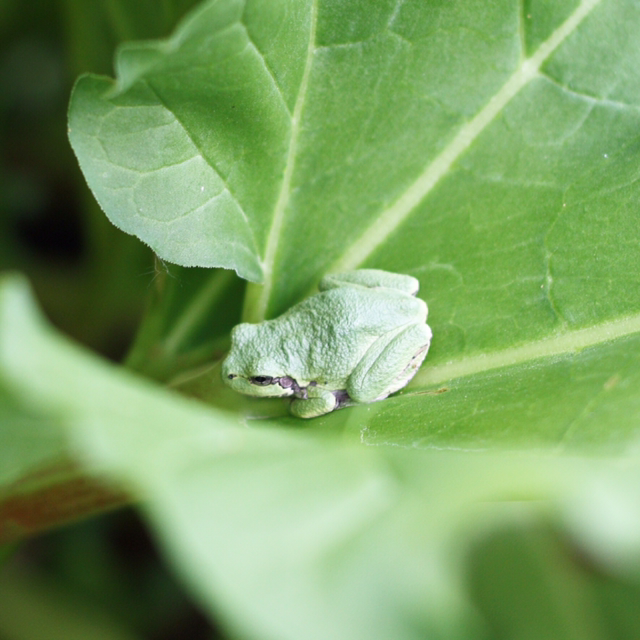 INGREDIENTS - 10 stalks of rhubarb, fresh or thawed from frozen - 1 orange - 1 lemon - 1 cup of white granulated sugar (can substitute other sweeteners) - fresh water - rum or vodka (optional) - 1 orange, 1 lemon and mint leaves for garnish DIRECTIONS 1. Bring a pot of fresh water to boil, approximately 4 cups 2. Chop the rhubarb stalks and add to boiling water and reduce to medium heat 3. Zest the peel of one orange and add to the pot 4. Cook until the rhubarb is soft and mushy - about 10 minutes will do 5. While the rhubarb is cooking get a fine wire mesh strainer, or cheesecloth and place it inside a colander, and put it over a wide-mouth pitcher, large bowl, or another pot that you can work with to create a solid base, you don't want your strainer to slip away! 6. Take the cooked rhubarb and pour the contents of the pot through your mesh strainer or cheesecloth and discard the solid pieces 7. Juice your lemon and orange and add the juice to your rhubarb concentrate. 8. Put a pot on to boil with another cup of water and one cup of sugar to make the simple syrup, keep on the heat until the sugar is dissolved 9. Add the simple syrup to the rhubarb water in a pitcher and put it in the fridge to cool 10. Once the concentrate has cooled and you're ready to serve pour 1/3 cup rhubarb concentrate, 2/3 cups sparking water, 1 oz of rum or vodka and a generous amount of ice into a glass 11. Garnish with lemon and lime wedges and a sprig of mint and enjoy! * adjust the ratio to your taste - you may prefer it to be sweeter than this! Makes 5 cups of rhubarb concentrate. Will yield about 10 servings when added to sparkling water.   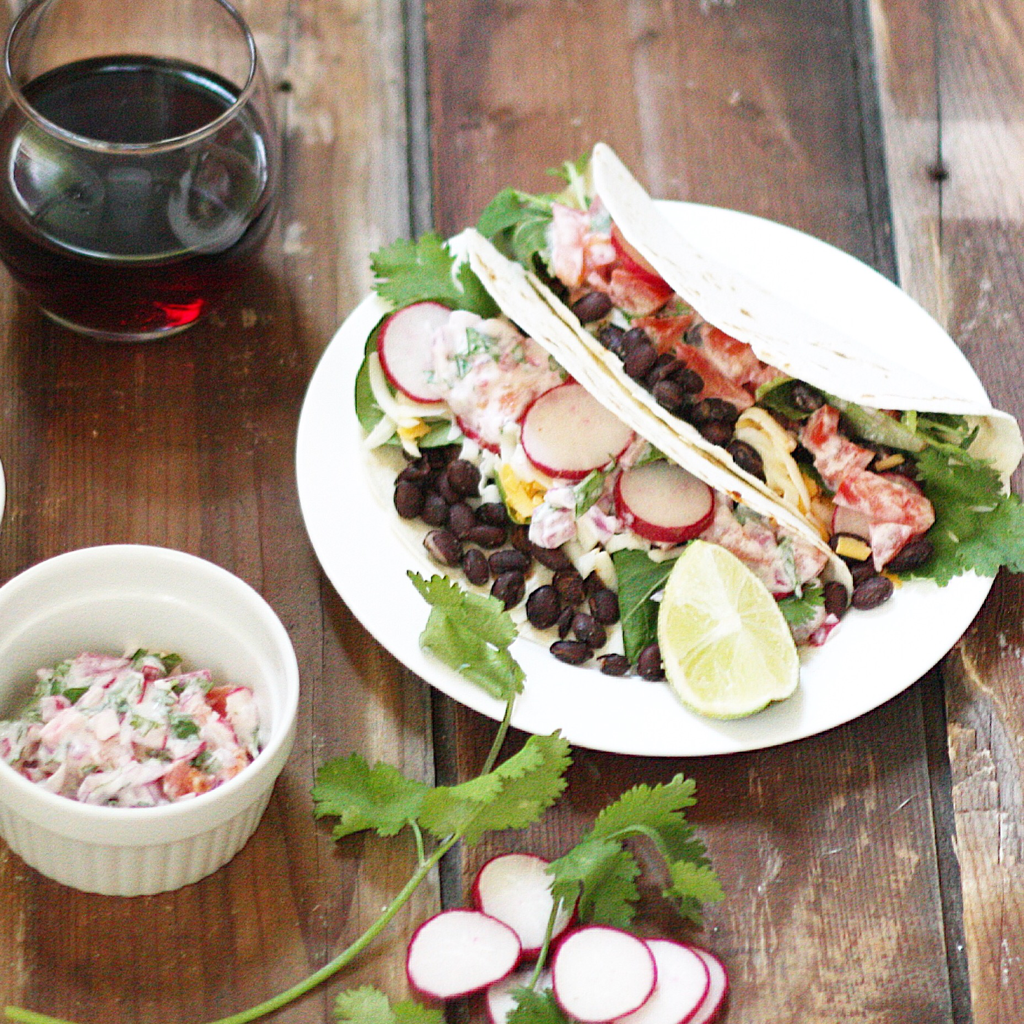 I'm pretty sure I could take freshly squeezed lime juice and cilantro and add any ingredients to make a slaw, put it in a taco and fall in love. This red radish slaw is my new favorite - its a twist on classic coleslaw and uses crispy fresh radishes and red onion instead of cabbage and carrots and it is delicious! I have to admit, I'm on a radish kick these days. I love the bright white and beautiful red colour of a fresh radish. It has a wonderful crispy crunch and a peppery bite that I just can't get enough of. I'm also all about tacos with slaw. Creamy, rich and full of flavour that brings the whole taco together. Whether it's fish tacos with a sweet heat pineapple slaw or grilled chicken and a broccoli slaw, I am all about the slaw! The tacos come together so easy and it's soooo delish! This red radish slaw is paired with black beans, tomatoes and fresh green salad. This is taco heaven! It's meatless too so it's a great choice for meatless Mondays or for vegetarian meals. INGREDIENTS - taco shells - 1 can of black beans, rinsed and drained - 1 bunch of red radishes - 1/4 red onion - 4 tomatoes - 1/4 cup mayonnaise - 1 lime - cilantro - 1/4 tsp chilli powder - soft flour taco shells - shredded Monterey Jack cheese (optional) DIRECTIONS 1. Combine mayonnaise, lime and chilli powder together in a small bowl and stir well 2. Finely chop two tomatoes, the red onion, some of the cilantro and half of the radishes and stir into the slaw. (This can be made ahead, covered and put in the fridge until ready to use) 3. Rough chop the other 2 tomatoes and cilantro, and slice the remaining radishes. 4. To make the tacos spread the slaw first, this will help hold everything together, and layer up with your choice of ingredients: tomatoes, radishes, black beans, cilantro and grated cheese!  I love the fresh citrusy scent of grapefruit and the gorgeous colour of a Ruby Red grapefruit. I remember eating grapefruit a as a child, halved, placed in a bowl and piled high with sugar. We had these little grapefruit spoons with a pointed tip and sharp little teeth on the sides to help cut the grapefruit away from the rind. I never really understood that... something sharp enough to cut through grapefruit that you then spoon it into your mouth. You know? As a child I loved and hated that spoon. Cut cut dig dig. I wonder where those spoons even are today.... probably in the deep abyss of the cutlery drawer. But let's get back to our gorgeous grapefruit! It's tart and tangy and sweet all at once. It makes you pucker your lips and even crinkle your nose when it's a particularly tart fruit. But then that sweet note hits you and the tartness goes away. Mmmmm. Grapefruit is loaded with over half of your daily vitamin C requirement as well as other key vitamins and minerals and 6 grams of fibre per fruit. We all need to count our fruit and veggie servings each day for optimal health and this smoothie counts as 3 servings of fruit! Making a smoothie with a pealed grapefruit is a great way to keep the beneficial fiber and blending it with fruit like a sweet banana really balances the taste of the grapefruit. Smoothies are great for busy mornings and they are a healthy snack option throughout the day. INGREDIENTS - 1/2 grapefruit - 1 banana - 1 sage leaf - fresh water DIRECTIONS 1. In a high power blender blend 1/2 a peeled grapefruit, 1 peeled banana, the sage leaf and 1/4 cup of fresh water 2. Add more water if needed to get your desired consistency    Oh wow, how do I love thee fresh berry?! Let me count the ways! Haha! I have to tell you all that I love love, love, fresh berries. I buy them all season long and use them in just about everything. Muffins, salads, pancakes, oatmeal, smoothies, desserts, oh - and of course sangria! This morning I'm enjoying them au naturel, with Greek yogurt and homemade granola sprinkled on top. This Fresh Berries with Yogurt and Granola is another one of these quick and easy breakfast recipes! We all have those mornings when we're running late and this is a snap to put together. It's also super healthy, packed with vitamins and minerals, fibre and protein. This breakfast dish is also great as a snack or even for dessert. At only 186 calories per serving it sounds good to me! And seriously, these berries are so good for you, so enjoy these delicious healthy berries while they last! INGREDIENTS - 1 cup of fresh berries - 1/2 cup of Greek yogurt - 1 tbsp granola DIRECTIONS 1. Put all the ingredients together in a bowl and enjoy!   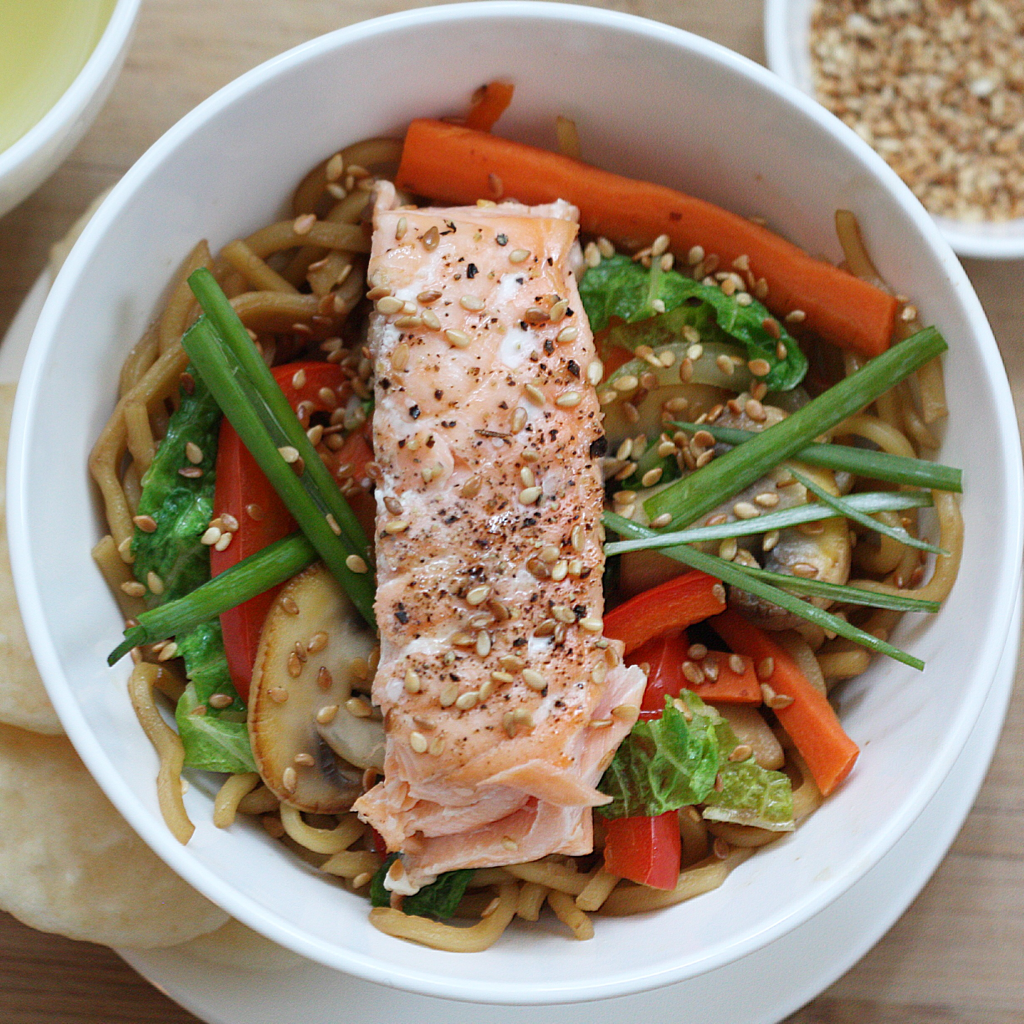 Oh boy - this home is filled with salmon lovers! And that makes me happy because I love salmon and salmon is so good for you! This kind of meal is right up my alley. It's well balanced, full of vitamins and minerals and it's delicious! And let's talk about our nutrient dense powerhouse - SALMON! Salmon is an excellent source of omega-3 fatty acids which are so important for brain function and a healthy nervous system. It also has high levels of selenium, potassium and vitamins B12 and D. The list of health benefits of salmon goes on and on and I don't want to ramble on, but if there's only one thing you really need to know it's that salmon is amazing for optimal health! I love this recipe because it is completely adaptable, you can add virtually any vegetables you have on hand: bok choi, onions, celery, baby corn, spinach... the possibilities are endless. Most vegetables are low in calories but have the benefit of vitamins, minerals, fibre and filling you up! So if you're watching your calories go ahead and pile on the veggies! Now, I know what you're thinking.... this recipe has a lot of steps and a lot going on. But I promise you it won't take long at all to pull this dish together. The noodles cook in 3 minutes flat and the salmon hardly takes any time to prepare and cook either. While the salmon is in the oven you can make your sauce and stir fry the veggies, it all comes together in 30 minutes or less! You and your family will love this salmon dish, it's so yummy and good! *tip! do all of your diving and chopping before you start cooking, I often find this is the most time consuming task I do want to point out that the sodium count is high, thus the reason for using low-sodium soya sauce. You can adjust the amount of soya sauce and oyster sauce to suit your taste and dietary needs. INGREDIENTS - 1 salmon filet - 1/4 tsp kosher salt - 1/4 tsp ground black pepper - 1/2 package Chinese steam fried noodles - 1 tbsp vegetable oil - 1 cup sliced mushrooms - 1 red bell pepper, cut into strips - 1 carrot, cut into matchsticks - 1 cup suey choy, chopped - 1 tbsp tapioca starch or corn starch - 1/3 cup warm water - green onion, sliced into matchsticks - 1 tbsp toasted sesame seeds SAUCE - 1 tsp sesame oil - 4 tbsp low sodium soya sauce - 4 tbsp oyster sauce - 2 tbsp hoisin sauce - 1 tbsp sugar (optional) - 2 cloves garlic, grated or pressed DIRECTIONS 1. Preheat oven to 425F 2. Prepare salmon filet by rinsing in fresh water and pat dry 3. Season filet with salt and pepper and place on a greased baking dish 4. Bake salmon until done - when a fork easily flakes the salmon, about 8-12 minutes for every inch thickness of the salmon filet 5. Bring a large pot of salted water to boil and cook noodles for 2-3 minutes, rinse and drain (or as per the package instructions) 6. In a saucepan mix all sauce ingredients and stir over medium heat 7. In a wok or large frying pan add vegetable oil and stir fry mushrooms, carrots, pepper and suey choi on medium high heat until vegetables just become tender - don't overcook, they'll become mushy 8. Add sauce and noodles and stir over medium-low heat 9. In a small bowl mix starch with warm water until starch has dissolved 10. Add starch mixture and stir 11. Dish out serving of vegetable-noddles on a plate and top with salmon, green onion and toasted sesame seeds and enjoy! serves 4 Have a great day and Love Good Food! ❤️  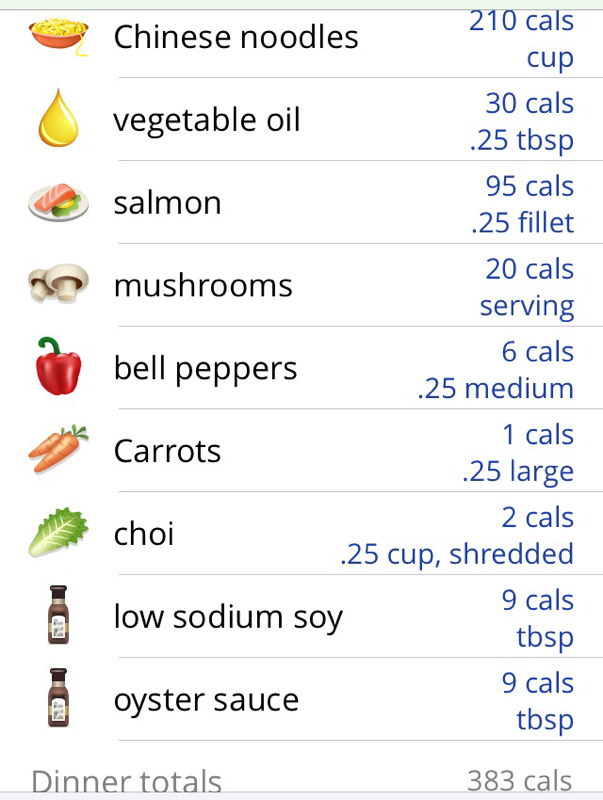 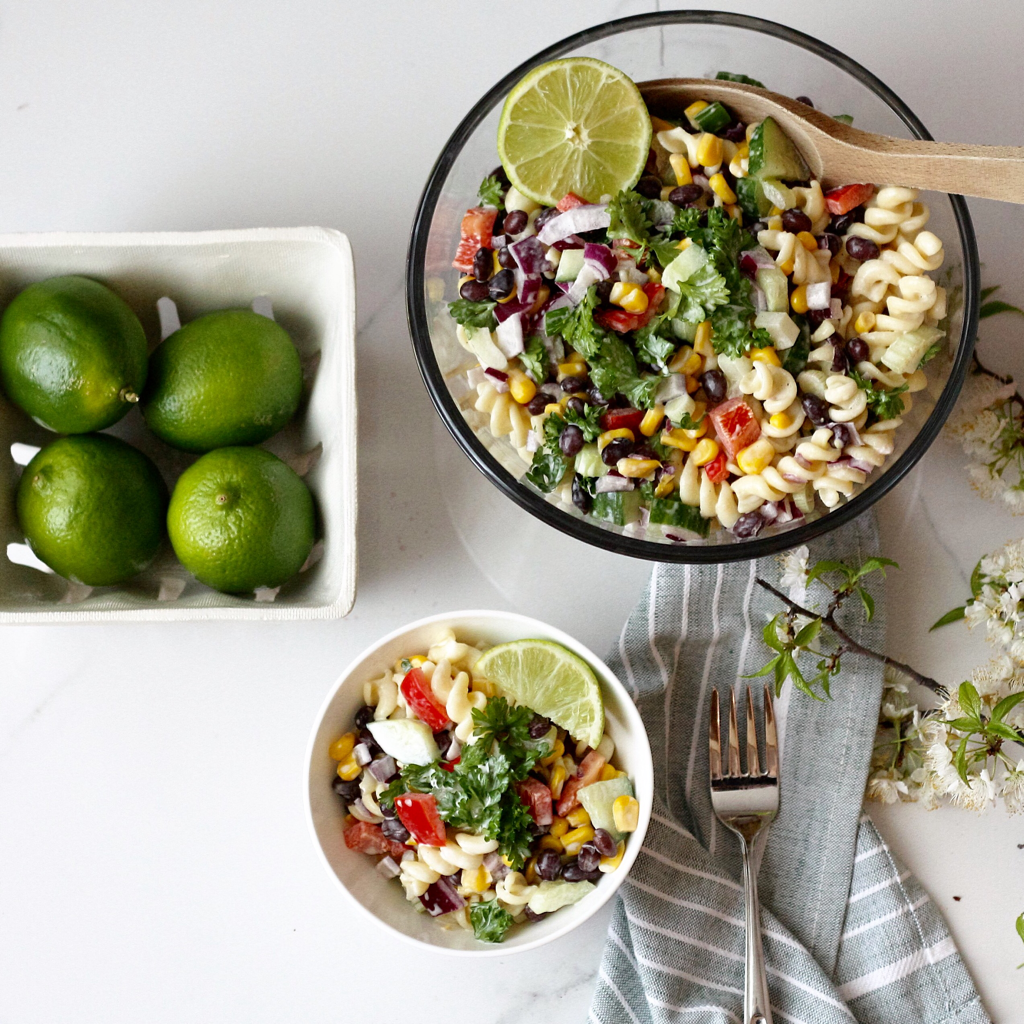 It's the weekend and you know what that means - picnics, bbqs, cookouts and potlucks! The sun is shining and I know many of you will be spending time with family and friends. And what's a day with friends and family without great food? Well... it's probably a day of rumbly tummies and grumpy people! (at least with my family!). The thing about cooking for a crowd is taking into consideration everyone's likes and dislikes. This creamy citrusy dressing is delicious and it's filled with fresh veggies and packs a hit of protein - perfect for vegetarians. It isn't spicy or fishy or high fat or bland. Its mild flavours will accompany most dishes and is sure to be a hit with friends and family, even the little ones so it's perfect to bring along! This salad is so easy to make and prepare ahead. Letting the salad rest in the fridge will help develop the flavours and let the pasta absorb the dressing. I like my fusili salad a little saucy. Sometimes I find when it sits in the fridge that the pasta absorbs all of the dressing, if this happens to you just whip up some more dressing and toss! Mmmm..... I'll probably eat a whole bowl for lunch even before we head out the door! 😋 Fun fact: most plants are incomplete proteins but combining beans and corn together provide all of the essential amino acids as a complete protein! Update! I'm excited to let you all know that this recipe was featured on the feedfeed's Clean Eating page! https://thefeedfeed.com/lovegoodfoodblog/creamy-corn-and-blackbean-salad And check out the feedfeed's page for more Clean Eating recipes! https://thefeedfeed.com/clean-eating-recipes INGREDIENTS - 1 lb of fusili pasta - 1 cup black beans, rinsed and drained - 1 cup corn - 1 bell pepper, chopped - 2 celery stalks, chopped - 1/2 cucumber chopped - 1/2 red onion, diced - 1/2 bunch of parsley, chopped - 1/4 cup mayonnaise - 2 tbsp white vinegar - 2 limes - 1 tbsp sugar - 1 tsp kosher salt - freshly ground black pepper DIRECTIONS 1. Cook the pasta in salted water as per the directions on the package to al dente 2. In a large bowl combine mayonnaise, the juice of 1 lime, vinegar, sugar, salt and pepper and stir 3. Drain pasta and add to dressing and mix well 4. Add black beans, corn, cucumber, celery, bell pepper, onion and parsley and stir all together 5. Cut the second lime into wedges and serve! * tip! pasta cooked al dente will stand up better in a pasta salad, over cooked pasta wil become mushy Have a great day and Love Good Food! ❤️   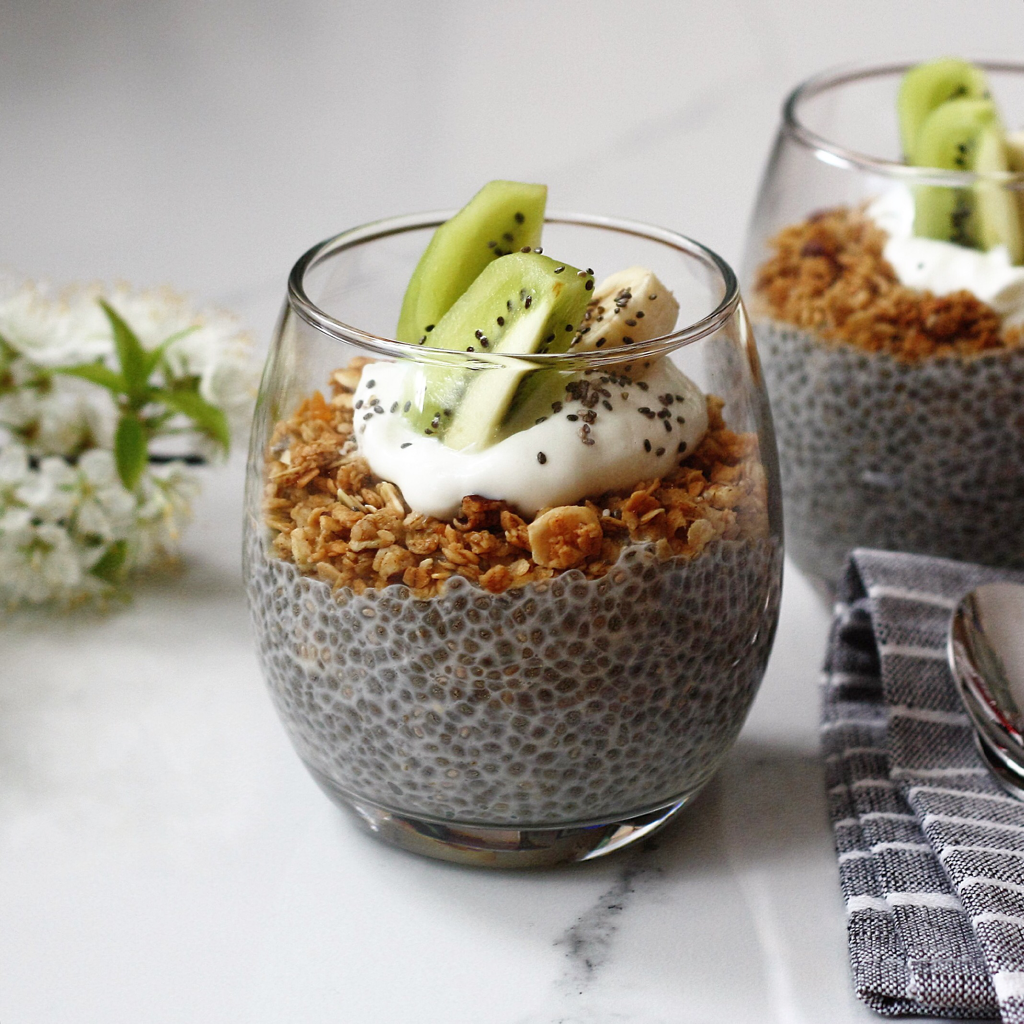 Chia pudding is all the rage and it's no wonder. It is a SUPERFOOD loaded with fibre, protein, anti-oxidants, omega-3 and omega-6 fatty acids. It's versatile and sooo good for you. Chia seeds are often soaked ahead of time, which makes the most nutrients available to our bodies to use. After the seeds have been soaked they end up having this amazing "glooby" texture. You know what I'm talking about, right? My kids think it's funny the way the seeds feel in their throats when they swallow. So we call them glooby seeds here at home! If you haven't tried them, you just have to experience it to know! A great way to enjoy chia seeds is in chia pudding. This chia pudding is so pretty, it's great for breakfast, a snack. and definitely for dessert! Chia pudding is so versatile because the flavour is so mild that you can adapt it to any liquid and toppings of your choice, like this one soaked in almond milk topped with homemade granola, a dollop of Greek yogurt with kiwi and banana slices. I use unsweetened almond milk, it's low fat, low calorie and adds a sweet taste to the chia pudding. This is seriously beautiful and sweet enough to serve as dessert! I'm excited to let you all know that this recipe was picked up by the feedfeed's Best Chia Seeds Recipes - check it out https://thefeedfeed.com/lovegoodfoodblog/almond-chia-pudding-with-granola-banana-and-kiwi INGREDIENTS - 1/2 cup chia seeds - 1 cup unsweetened almond milk - 1 small banana - 1 kiwi - 4 tbsp granola (homemade or commercial) - 4 tbsp plain Greek yogurt DIRECTIONS 1. Prepare the chia pudding at least 4 hours ahead of time, or overnight 2. Pour chia seeds in a container and add almond milk, stir well, cover and place in the fridge 3. After chia seeds gel and set and ready to serve, spoon out pudding into two bowls 4. Slice kiwi and banana and add to chia pudding 5. Top off with granola and Greek yogurt makes 2 servings Have a great day and Love Good Food! ❤️  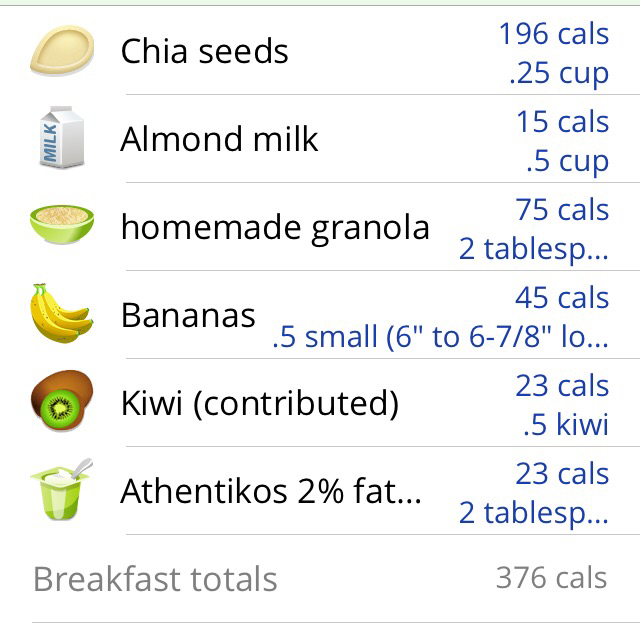  This may seem like such an easy recipe that it's hardly worth writing about but honestly, you're going to want this one in your back pocket. You can make this in a snap and it's super healthy. I couldn't believe how scrumptious the smell of the grapefruit was as it began to release its juices under the broiler. Mmmmmm - heavenly! But truthfully, this broiled grapefruit would be delightful for breakfast on a chilly morning and the perfect dessert on a hot summer night. INGREDIENTS - 2 grapefruit - 4 tsp golden brown sugar - 1 cup of plain Greek or Balkan style plain yogurt - 1/2 lemon - basil leaves DIRECTIONS 1. Turn on your oven's broiler to HIGH 2. Slice grapefruit in half and slice just a touch off the bottom of the grapefruit so it rests firm and place on a baking sheet 3. Spread 1 tsp of brown sugar on each grapefruit half and put in oven 4. Broil for approximately 5 minutes, the grapefruit releases a gorgeous citrusy smell when it's ready 5. Take out of the oven and place one half on each plate 6. Too each one with a dollop of plain makes 4 servings Have a great day and Love Good Food! ❤️  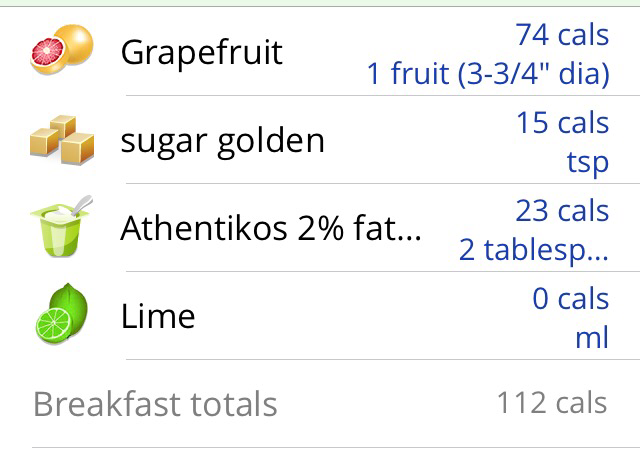 |
AuthorWife, mother and pilot, with a passion for good food. Archives
November 2016
Categories
All

https://foodgawker.com/?author=love+good+food

|
 RSS Feed