 If you're like me, your kids have a love-hate relationship with cauliflower. My youngest wrinkles his nose at the sight of it without even taking a bite but then the next day he's eating it covered with a glob of hummus. But I tell ya, your kids won't even know that they're eating cauliflower when this dish shows up on their plate. Cauliflower rice is rapidly gaining popularity because of it's health benefits, it fits into a paleo diet, it's low carb and gluten free - what's not to love? It's being used as a side dish and as a low-carb gluten-free alternative to rice and couscous. Cauliflower's mild flavour is so versatile it lends itself well to any flavour profile you want to add! Turmeric is also having its time in the spotlight for its amazing medicinal properties. Tumeric has a natural anti-inflammatory compound, increases the antioxidant capacity of the body, improves brain function, lowers the risk of heart disease, help prevent cancer and Alzheimer's and even help delay aging. Tumeric has definitely earned its place as one of the most effective natural substances out there! With these two powerhouses teaming up you're sure to be on your way to health and well being! INGREDIENTS - 1 regular size head of cauliflower, approximately 4 cups - 1 1/2 tbsp olive oil - 2 cloves of garlic, grated - 1 tsp kosher salt - fresh ground black pepper - 1 tsp ground turmeric - chives, chopped - parsley, chopped DIRECTIONS 1. Wash and trim cauliflower and cut into pieces 2. In a food processor blend cauliflower in batches until it turns into a grainy consistency - it won't take long, about 7-8 pulses * if you don't have a food processor you can also grate the cauliflower into small pieces 3. Heat up a large frying pan on medium heat and add oil. 4. Add cauliflower rice, garlic, tumeric, salt and pepper to pan and stir frequently 5. Cook cauliflower for 8-10 minutes 6. Add chopped parsley and chives and stir 7. Fluff with a fork and serve! makes 4 servings Have a great day and Love Good Food! ❤️  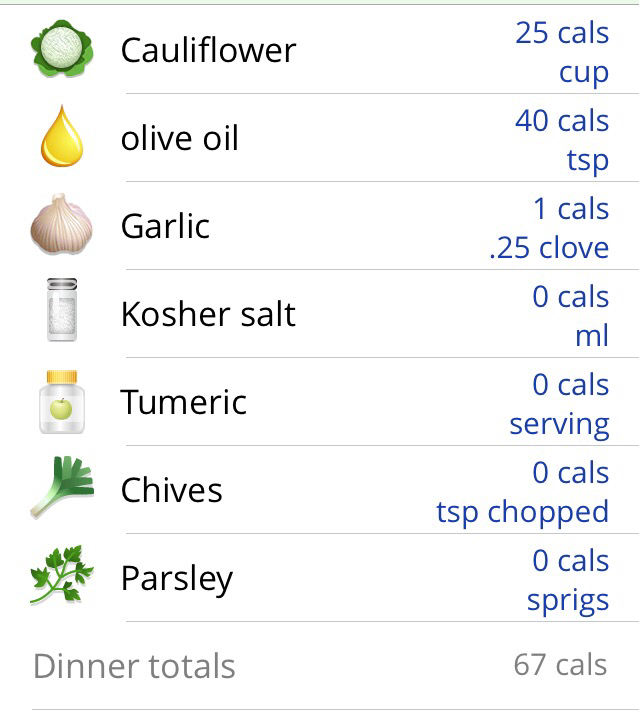
0 Comments
 You can't go wrong with a gorgeous bowl of fresh fruit salad. It's great in the morning with your breakfast, as a snack or as a dessert. You can dress it up or dress it down, whip cream, yogurt, mint leaves, just use your imagination! I know what it's like when you're watching your calories but are craving something sweet. Fresh fruit is a great way to curb that sweet tooth. The bonus - it's low in fat and has fibre and tons of vitamins! Win win! Oh - and there isn't anything technical to this dish so even anyone with no cooking skills can master this one! Bonus! INGREDIENTS - 1 cup fresh pineapple, cut - 1 kiwi, slices - 1 banana, sliced - strawberries - 1 tbsp shaved or grated coconut DIRECTIONS 1. Combine ingredients in a bowl and serve!!! serves 4 Have a great day and Love Good Food! ❤️  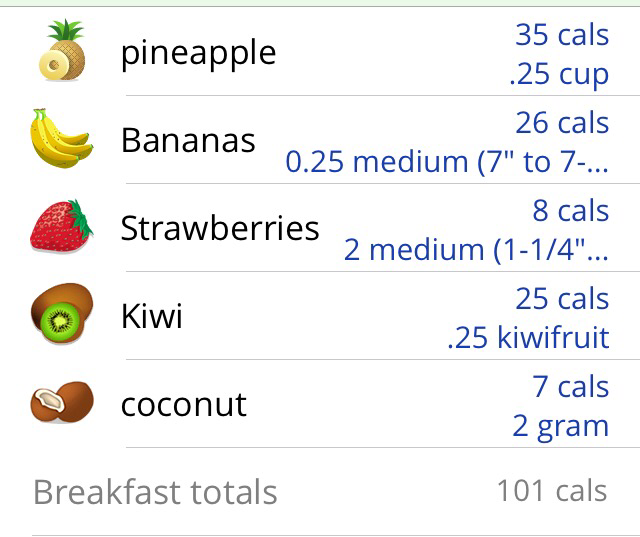  I love when you have leftovers that can be reinvented into something fabulous. Last night I made a huge pot of rice and had leftover rice. I knew I would use it for something and after digging into my produce drawer this afternoon and seeing the bell peppers, red onion, cucumber and celery I knew what this dish would become. Salads like this one are great for meals on the go. The dressing is already mixed in and and because there isn't any lettuce to wilt it will stay fresh and tasty for hours. Bonus: you don't even need to bring a messy salad dressing container! It is loaded with fresh vegetables and because of the beans you get a hit of protein and fibre! In fact, this salad is so versatile the next time you're having a BBQ or heading to a potluck think about taking this great Black Bean & Rice Salad. Be sure to make a big batch so you can have it as your lunch, as a side dish or as a healthy snack. INGREDIENTS - 1 cup cooked rice - 1 cup black beans, rinsed and drained - 1/2 cup diced celery - 1/2 cup diced cucumber - 1/2 cup diced red and yellow bell pepper - 1/4 cup diced red onion - 1 avocado - 1 lime - fresh cilantro - 3 tbsp white wine vinegar - 1/4 cup of olive oil - 1 tsp chilli powder - 1/2 tsp red pepper flakes - 1 tsp kosher salt - black pepper - 1 tsp white sugar (optional) - 1 clove grated fresh garlic (optional) DIRECTIONS 1. Put rice, black beans, celery, peppers, red onion and chopped cilantro in a large bowl and stir 2. In a small bowl or in a small jar with a tight fitting lid, combine olive oil, vinegar, juice of 1/2 lime, chilli powder, red pepper flakes, salt and pepper, and if it suits your taste add sugar and/or garlic. Shake or stir! 3. Pour dressing over salad and mix well. * the flavours of the dressing will develop over time so if you have time pop the salad in the fridge for an hour or more before serving 4. To serve, scoop 1 cup of salad in each bowl and top with 1/8 lime wedge and avocado and enjoy! serves 4 Tip! The rule of thumb for making salad dressing is to mix 1 part vinegar to 3 parts oil. But this ratio isn't a fixed rule, if you prefer your dressing a little more tart you can add a splash more vinegar  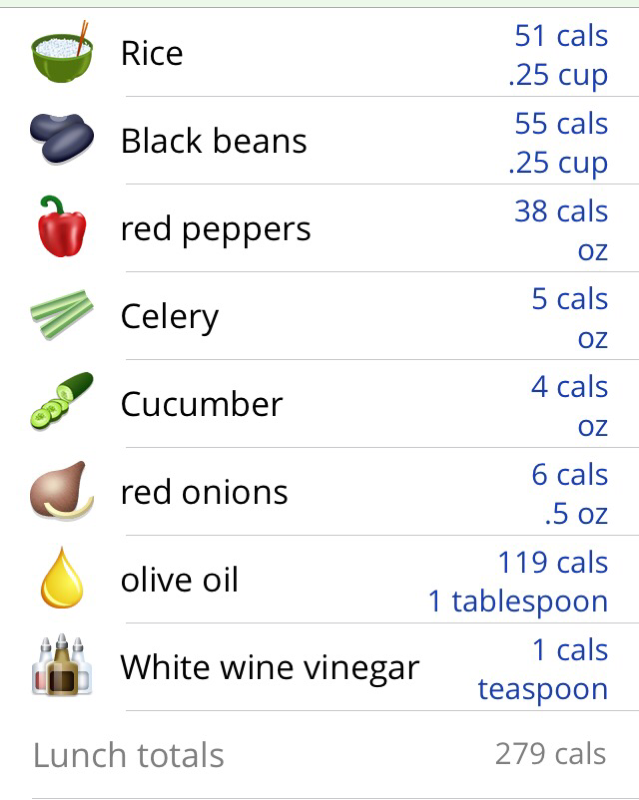  Busy busy night! Tonight was the first night of soccer for my little boys this year. While I had the pizza in the oven one was asking me to help him with his shin guards and I totally forgot about the the pizza! 😮 Thankfully I saved it and we gobbled it down before heading out the door. So basic, so fast, yet so good. Marinara sauce, tomatoes, and mozarella topped with fresh arugula and toasted pine nuts. I'll let you in on a little time-saver secret, instead of pizza dough I just used a large soft flour tortilla! I always have tortillas on hand and they make a great thin crust base for your pizza. Perfect on a busy night! But by all means if you have the time use traditional pizza dough it will be extra delicious! INGREDIENTS - 1/3 cup of homemade marinara sauce or ready-made pizza sauce in a pinch - 1 large soft flour tortilla - 1/2 cup diced tomatoes - 1 cup shredded mozarella cheese - 1 cups fresh arugula - 2 tbsp pine nuts DIRECTIONS 1. Pre-heat the oven to 400F 2, Place the tortilla shell on a pizza pan or a large baking sheet 3. Spoon the marinara sauce (or pizza sauce) onto the tortilla and using the back side of the spoon spread the sauce around the shell. If you like it more saucy by all means add more sauce! 4. Put the mozarella cheese on top and add the diced tomatoes (and any other chopped vegetables of your choice) on top of the cheese 5. Put the pizza in the oven for 5-10 minutes, at the 5 minute mark watch it closely, the pizza will be ready when all of the cheese has melted and starts to bubble 6. (Optional) I love the cheese on top of my pizza to get a little brown, if you want to add this step turn on the broiler to HIGH for a few minutes and let the cheese brown under the broiler * watch this step very closely, the heat on the broiler is very hot and it will go fast! 7. Take the pizza out of the oven and let stand for a few minutes 8. Take a small frying pan and put the pine nuts in the pan over medium heat 9. Stir the nuts continuously, it will take a few minutes to start to toast but once they start browning watch them closely, it won't take long 10. Once the pine nuts start to brown take them off the heat 11. Spread the arugula over the pizza and top with toasted pine nuts. 12. Slice and serve! makes 2 servings Have a great day and Love Good Food! ❤️  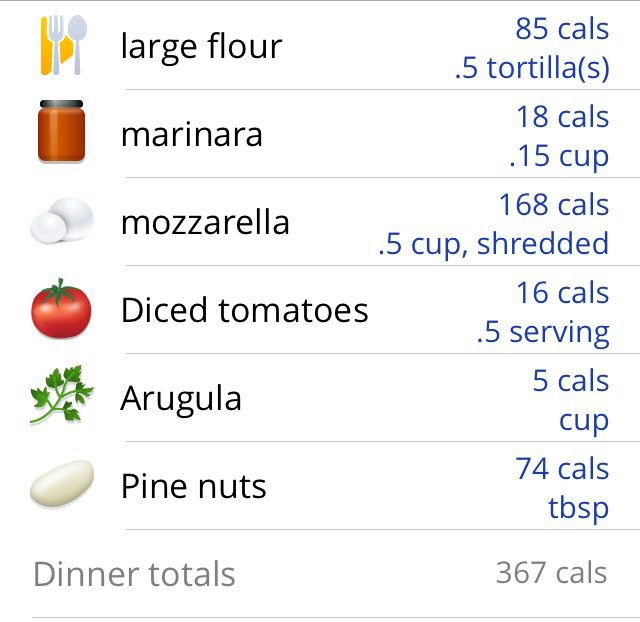 Nutrition ratio: 54:27:19
I love cheese so I load it on and that's why 1 serving is half a pizza. I serve this with a salad but you can reduce the amount of cheese and enjoy the whole pizza for your dinner.... it's the cheese that packs on the fat count 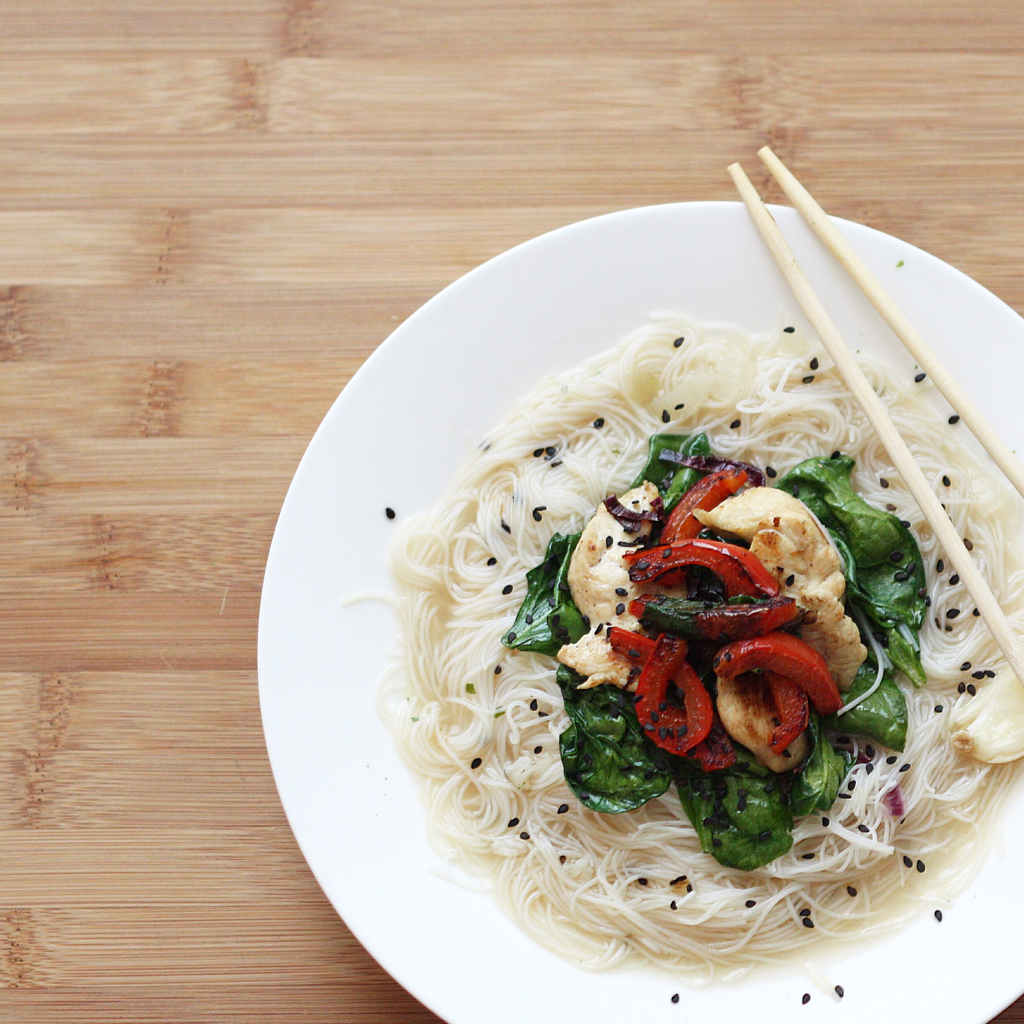 When I think of comfort food, hot chicken noodle soup always comes to mind. It's warm and yummy and helps make you feel better when you're a little under the weather. This rice vermicelli bowl with roasted chicken is my Asian spin on the old chicken noodle classic. Long white rice vermicelli noodles are placed in a hot bowl of ginger-garlic broth and topped with roast chicken and stir fried veggies. Just a head's up - there are a few steps to this meal and you'll have a few dirty pots at the end, but I promise, it'll all be worth it! Some of the health benefits of this yummy spin on chicken noodle come from the garlic and ginger. The medicinal properties of garlic and ginger have been known for centuries. They were prescribed for ailments such as morning sickness, heart disease, colds, tick bites, arthritis, and a whole slew of other ailments but I won't bore you with a whole essay on it! Just know that we can all benefit from the antioxidants and immune system boosters of ginger and garlic! The next time you aren't feeling well I hope someone brings you a piping hot bowl of Rice Vermicelli in a Ginger Garlic Chicken Broth. And it seems that the feedfeed agrees that this bowl of comfort food will help you feel better too! It has been featured on their Feel Better feed, check it out: https://thefeedfeed.com/lovegoodfoodblog/vermicelli-noodles-with-ginger-garlic-chicken-broth. INGREDIENTS - 1 package of white rice vermicelli noodles - 2 chicken breasts - 2 tbsp vegetable oil - 4 cups of homemade chicken broth or a 32 oz/900 mL carton of low-sodium chicken broth - 2 tbsp fish sauce - 1/2 inch of fresh ginger, sliced coin sized - 2 garlic cloves, smashed with the side of a knife blade - 1 tbsp kosher salt - 1 tbsp white sugar - 1/2 small red onion, chopped - 1 red pepper, cut into strips - 1 bunch spinach leaves (approximated 2 cups) - 1 tbsp black sesame seeds - soya sauce DIRECTIONS 1. Bring a large pot of salted water to boil for the vermicelli noodles 2. Meanwhile heat up 1/2 tbsp of vegetable oil in a frying pan 3. Chop up chicken breast and place in a frying pan and cook chicken until outside of chicken is browned and the chicken is cooked through - put aside 4. Put the broth in another pot and bring to a boil - I promise, you'll only have 2 elements on the go at any time! 5. Add fish sauce, 2 smashed garlic cloves, fresh ginger and sugar to the broth, add salt to taste and return to medium heat 6. Place vermicelli noodles in boiling water and cook for 2-5 minutes, or as per the package directions, stir to loosen strands, drain and put aside (the noodles will be ready when they're soft all the way through) 7. Heat up a wok on medium-high heat and add 1 tbsp of vegetable oil. 8. Add onion and peppers to wok and quickly flash-fry, once peppers and onions have softened a bit and have a bit of a sear, take off the heat and add the spinach and toss the spinach and vegetables until the spinach wilts (the spinach will "cook" in the residual heat of the pan and will wilt down substantially) 9. Now you're ready to put it all together! - pour 1 cup of broth in each bowl - place desired amount of vermicelli noodles in each bowl - spoon veggies and chicken breast on top of noodles - sprinkle black sesame seeds and you're ready to serve! * have soya sauce available on the table for anyone who would like a splash! makes 4 servings Have a great day and Love Good Food! ❤️  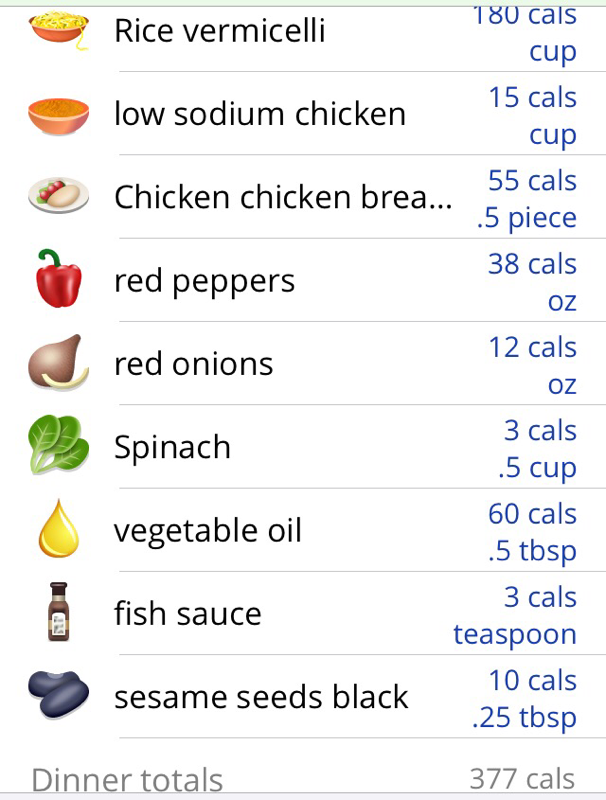 Nutrition ratio: 49:29:22
 Sometimes when you find something so warm and comforting you just keep coming back for more. That's the way I feel about our EVERYday oatmeal. You can't beat the health benefits from a bowl of hot oats that you can make in a snap. This take on one of my family's go-to breakfasts is all-Canadian. Quebec maple syrup, Ontario black walnuts, and oats and flax grown in the prairies. The amazing thing about maple syrup is the health benefits. What health benefits, you might ask? Well, I'll let you in in a little info -potassium, manganese, zinc, calcium, iron and magnesium. And not to forget all the benefits of oatmeal! INGREDIENTS - 1/3 cup quickoats - 1 tbsp flax meal - 2/3 cup boiling hot water - 1 tbsp maple syrup - 1 tbsp black walnut pieces DIRECTIONS 1. Scoop oats and flax meal into a cereal bowl 2. Pour 2/3 cup boiling hot water over oats and cover for 5 minutes to cook 3. When oats are cooked add walnuts and drizzle maple syrup on top. makes 1 serving Have a great day and Love Good Food! ❤️  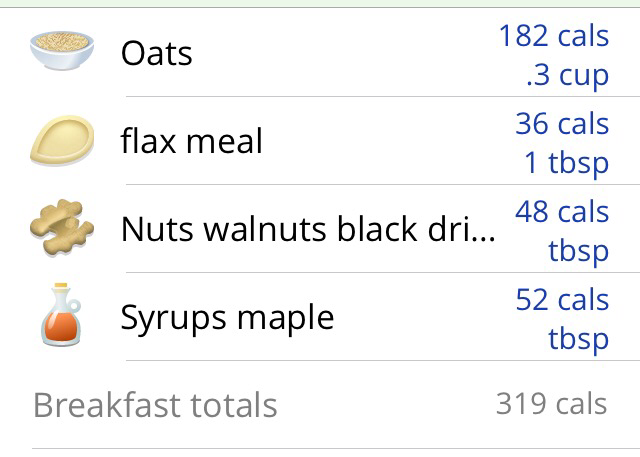  I discovered this purple wheat multi grain bread at my local bakery and I can't stop thinking of great ways to enjoy it! Whenever you get a chance you should try one of your local bakery's specialty breads, you just might be surprised how wonderful the new flavour can inspire your meals! Pairing this bread with avocado and an egg was a natural fit. And I just love the way when the avocado pit is removed it makes the perfect little nest for your poached egg! Avocados are the new superfood. They are loaded with fibre, healthy fats and tons of nutrients. Just a word of caution, if you're watching your daily fat intake avocados weigh in pretty hefty on the day scale. Many nutrition labels for avocados consider 1/5 of an avocado as one serving. But honestly, avocados are a superfood and you deserve all of the healthy benefits that avocados offer! INGREDIENTS - 1/2 avocado - 1 egg - 1 tbsp vinegar - 2 slices of multigrain bread - 1 tsp butter DIRECTIONS 1. Bring a saucepan of water to a boil and reduce to medium-low heat 2. Add vinegar to the water 3. Crack one egg into a cup or small bowl and gently pour the whole egg into the pot of water on the stove 4. Set the timer for 3 minutes for soft eggs, 4 minutes for medium and 5 minutes for firm eggs 5. While the egg is cooking toast bread and cut the avocado in half 6. Use a spoon to scoop the avocado half out from the skin 7. Lightly butter your toast and place the avocado on the toast 8. Using a slotted spoon remove the eggs from the pot and place in a bowl or directly onto the toast if you're ready to assemble * adding vinegar to the water will help the proteins in the egg to bind and help with the poaching Serves 1 Have a great weekend and Love Good Food! ❤️  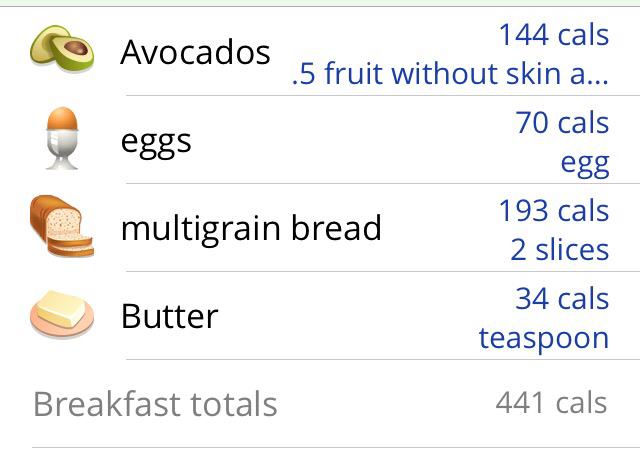  Alrighty, so what's the deal with avocados? Everyone seems to be talking about avocado toast. Well here's the low-down: avocados are nutrient rich, they are high in minerals, vitamins and good fats. But beware, they do contain a high amount of fat! If you look up the nutrition information for an avocado you might see one serving listed as 1/5 of an avocado. YES! You read that right, it's often considered that one avocado has 5 servings. So when you see only 4,5 or 5 grams of fat per serving you think "okay, great! I'll have an avocado!" But please know that a whole avocado is going to pack in about 22-25 grams of fat, and that's for a regular sized Haas avocado. But like all good food it's about how you balance your food choices over the whole day. I will usually have half an avocado so we're talking about 14 grams of fat. Not bad, I'll just be aware of not consuming too many other high fat foods for the rest of the day. It's all about balance! We should all enjoy the foods we love, especially ones like avocados when they're SO good for you! INGREDIENTS - 2 slices of whole grain bread - 1/2 avocado - 1 small sliced tomato DIRECTIONS 1. Toast the bread 2. While you bread is toasting rough chop your avocado and then put it in a bowl, use a fork to mash the avocado a little bit 3. Spread the avocado on your toast and place the tomato slices alongside Enjoy and Love Good Food! ❤️  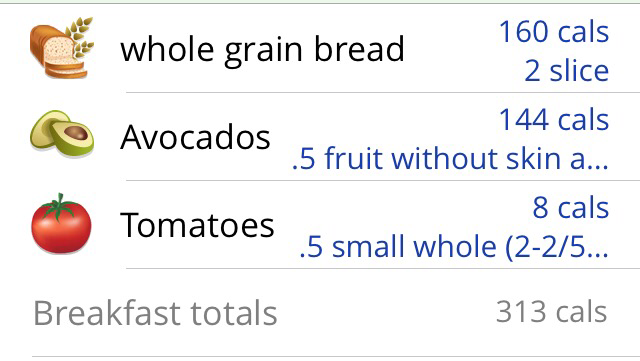 Nutrition ratio: 39:48:13
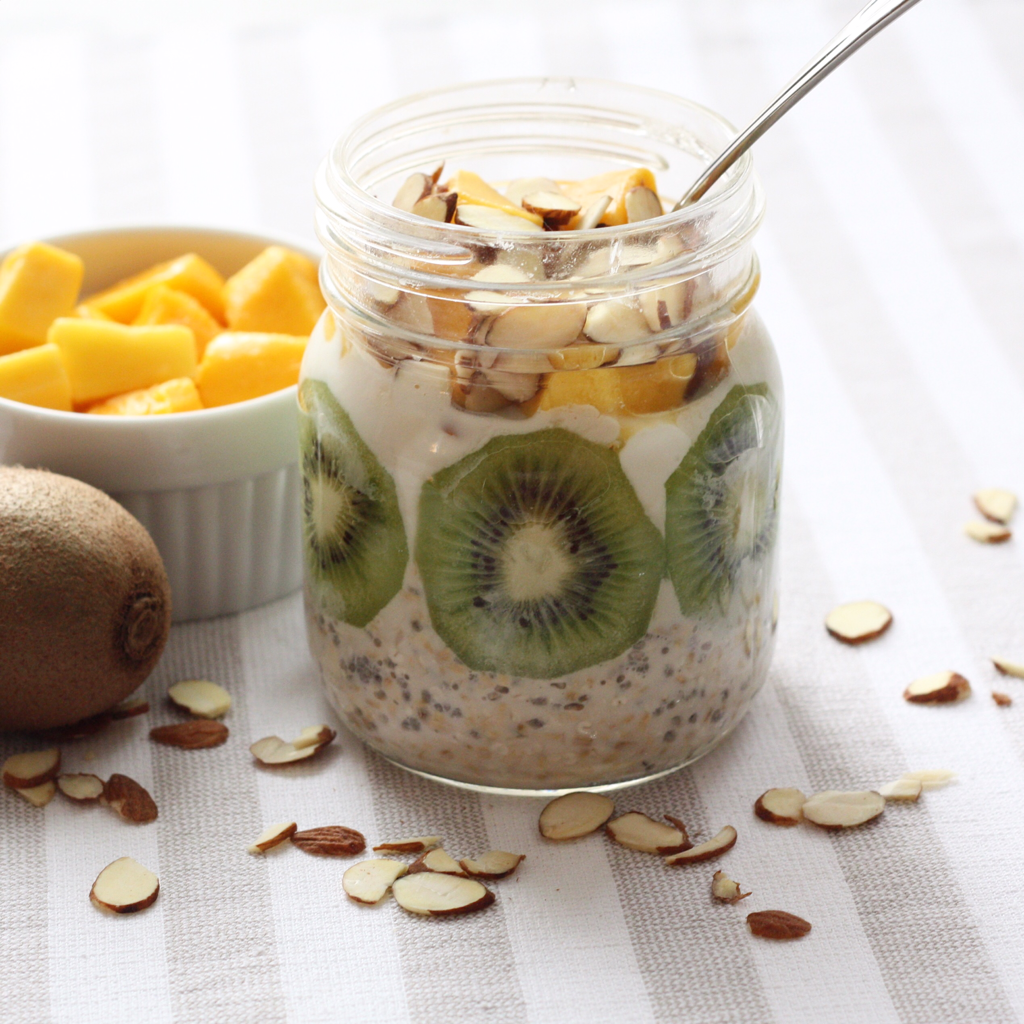 If you often find yourself running out the door without grabbing breakfast first and you haven't tried overnight oats, then what are you waiting for? This breakfast concoction is practically a bowl of oatmeal and a smoothie all rolled into one. And the best part? You make it the night before so in the morning it's practically grab & go! You can even save time in the morning by cutting your fruit the night before and putting it in a sealed container in the fridge. Then just quickly assemble it and put the lid back on and you're out the door! Once you discover overnight oats you'll never again have an excuse for skipping the day's most important meal! So what kind of milk so you use? You can use regular milk, soy milk, almond milk, rice milk, goat's milk, whatever your preference! You can also use any type of oats you choose, steel cut, old fashioned or regular, and add flax meal or chia seeds. The rougher the cut of oats the more chewy your oats will be. (These steel cut oats will give you a real chewy oat that you can really sink your teeth into.) Put the jar in the fridge overnight and voila! An instant cold breakfast waiting for you in the morning! Then top off with any toppings of your choice: fresh fruit, yogurt, seeds and nuts or honey! Putting low fat plain yogurt on top with fresh fruit, like we did here, will give you a really hearty and nutritious meal. This concoction provides you with 40% of your daily protein and 40% of your daily fibre needs, all for only 10 grams of fat! Now that's a great way to start your day! INGREDIENTS - 1/3 cup steel cut oats - 1/2 cup original unsweetened almond milk - 1 tsp chia seeds - 1/2 cup 2% Greek yogurt - 1/2 cup cut mango - 1 kiwi fruit sliced - 1 tbsp sliced almonds DIRECTIONS 1. The night before put oats, chia seeds and milk in a jar and give it a good stir or shake it well with the lid on it 2. The milk should cover the oats completely, if not add a splash more milk 3. Put the jar in the fridge overnight 4 In the morning scoop the yogurt and layer the fruit in the jar and enjoy! * you can put the lid on your overnight oats and take it with you in the morning to enjoy on your morning commute!  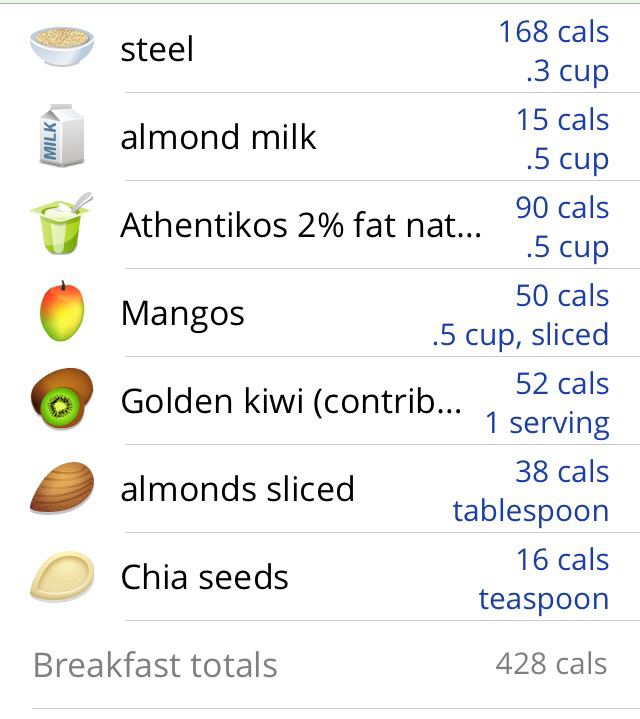 Calorie ratio 24:57:19
yoir brand of oats, milk and yogurt may have different nutritional values, please check the nutrition label on your containers for an accurate calorie and nutrition count  We all know that breakfast is the most important meal of the day yet some days you find yourself running out the door without having had a healthy meal. If you're one of those people then these amazing overnight oats were made for you! If you honestly don't even have five minutes to spare to make toast in the morning you can still have a healthy breakfast. All you need to do the night before is to put the oats in a container, and for this purpose a jar with a lid works wonderfully, and cover the oats with any milk of your choice. You can use regular milk, soy milk, almond milk, rice milk, goat's milk, whatever your preference! You can also use any type of oats you choose, steel cut, old fashioned or regular, and add flax or chia seeds. The rougher the cut of oats the more chewy your oats will be. (These steel cut oats will give you a real chewy oat that you can really sink your teeth into.) Put the jar in the fridge overnight and voila! An instant cold breakfast waiting for you in the morning! Then top off with any toppings of your choice: fresh fruit, yogurt, seeds and nuts or honey! Putting low fat plain yogurt on top with fresh fruit, like we did here, will give you a really hearty and nutritious meal. This concoction provides you with 40% of your daily protein and 40% of your daily fibre needs, all for only 9 grams of fat! Now that's a great way to start your day! INGREDIENTS - 1/3 cup steel cut oats - 1/2 cup original unsweetened almond milk - 1 tsp chia seeds - 1/2 cup 2% Greek yogurt - 1/4 cup raspberries - 1/2 banana sliced - 1 kiwi fruit sliced DIRECTIONS 1. The night before put oats, chia seeds and milk in a jar and give it a good stir or shake it well with the lid on it 2. The milk should cover the oats completely 3. Put the jar in the fridge overnight 4 In the morning scoop the yogurt and layer the fruit in the jar and enjoy! * you can put the lid on your overnight oats and take it with you in the morning to enjoy on your morning commute!   Calorie ratio 19:62:19
yoir brand of oats, milk and yogurt may have different nutritional values, please check the nutrition label on your containers for an accurate calorie and nutrition count  This is one of those ideas that you aren't quite sure if it will work or not. But believe me, if you have a huge watermelon just taking up prime real estate in your fridge that needs to be used up, a smoothie is a great way to enjoy it and use some of it up! You won't need to add much liquid to this smoothie because watermelon has such a high water content to start with. Just add a splash of water and you'll get this frothy watermelon glass of goodness. INGREDIENTS - 1 banana - 1 cup watermelon - splash of cold water DIRECTIONS 1. Put fruit and a splash of water in a blender and turn to the high setting to blend 2. Pour into a glass and enjoy!   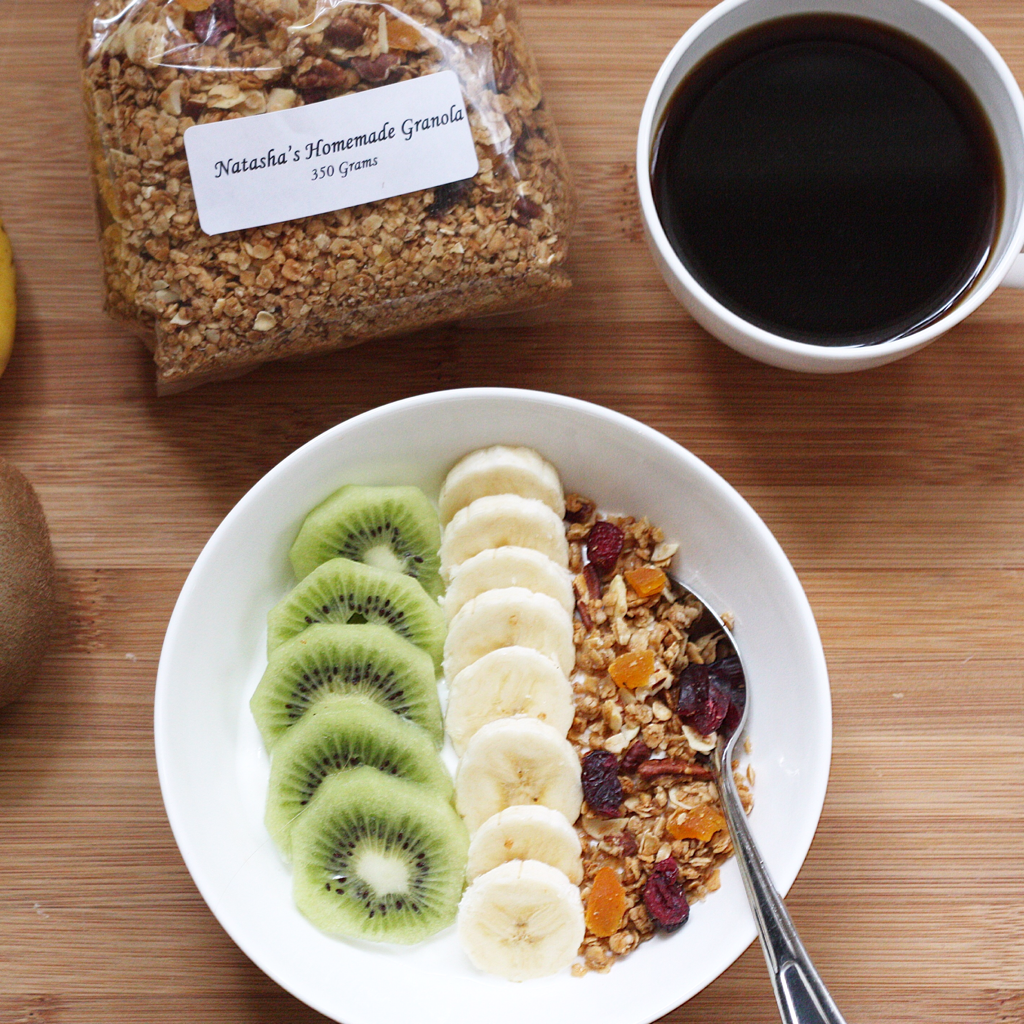 , I love supporting local businesses so I couldn't resist when I found this amazing homemade granola this weekend. It's made with oats, pecans, almonds, dried apricots, dried cranberries, brown sugar, honey, canola oil, vanilla extract, cinnamon and a pinch of salt. The are no preservatives or additives, just natural goodness. This breakfast bowl with yogurt, fresh fruit and granola is SO fast to prepare and it is so delicious AND nutritious. I used plain Greek yogurt but you can use any flavour of yogurt of your choice. My preference is always to buy plain Balkan or Greek yogurt, I love the tangy taste of natural yogurt and I don't like all the added sweeteners in other yogurt. Also when you add fruit and nuts to yogurt they have their own sweetness and flavour so you don't need the added sugar or artificial sweeteners found in flavoured yogurt. This morning I used Natasha's Homemade Granola but you can use a commercially prepared granola or even make your own homemade granola! Any fresh fruit will do, whatever fruit that is fresh and on sale is your best bet! Strawberries, kiwi, blueberries, bananas, raspberries.... The choice is yours! This combo delivers two servings of fruit, one serving of dairy and one serving of nuts. Adding fresh fruit ups your fiber intake for the day and who doesn't love fresh fruit? INGREDIENTS - 1/2 cup plain Greek or Balkan yogurt - 1/2 banana sliced - 1 kiwi sliced - tbsp granola DIRECTIONS 1. Spoon yogurt into bowl and place sliced fruit and granola on top That's it! Enjoy! Have a great food and Love Good Food ❤️  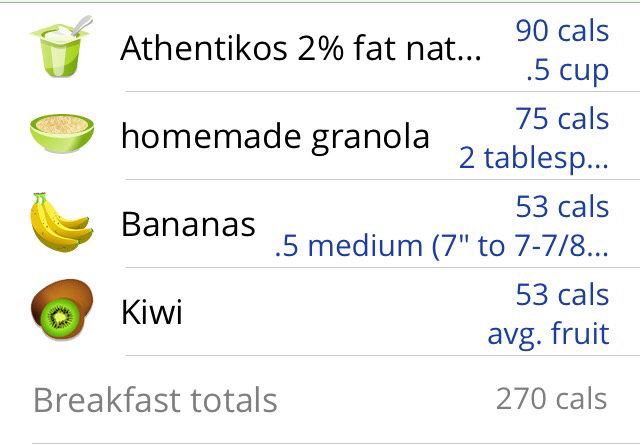 Nutrition Ratio 22:55:23
* actual calories based on Athentikos 2% fat greek yogurt  April 16th is National Eggs Benedict Day! Who knew?! I thought a great way to celebrate would be to make a lower fat version of this iconic breakfast classic. Swapping a slice of multigrain baguette for a whole English muffin saves calories and reduces carbs and using a slice of Black Forest ham instead of Canadian back bacon saves on both calories and fat. You can also use less hollandaise sauce than the classic recipes call for; often less is more and in this case less is more healthy! Now don't be intimidated and don't think that Eggs Benny are only for fancy chefs and Sunday Brunch at the 5-star hotel. For this recipe I just used the standard pots in my kitchen since I don't have a double boiler and I don't have a poaching tray either. No worries - you can make the poached eggs freehand in a pot of hot water. You can totally do this! Cheers Benedict! INGREDIENTS Hollandaise Sauce - 2 egg yolks - 1 tbsp fresh lemon juice - 2 tbsp melted butter - dash of kosher salt In addition you will need: - multigrain baguette slices - 4 fresh eggs - 1 tbsp white vinegar - 2 slices of Black Forest ham - pepper DIRECTIONS Hollandaise Sauce 1. Put a small pot of water, about an inch deep, on medium heat on the stove 2. Divide 2 eggs and put egg yolks in a stainless steel bowl 3. Add lemon juice to egg yolks and whisk until mixture becomes fluffy 4. Add a pinch of salt and place stainless steel bowl over the pot making sure the water is not touching the bottom of the bowl 5. Whisk egg mix and slowly add melted butter and keep whisking 6. The mixture will thicken slightly, don't leave it on too long or on heat too high, the eggs may scramble, take the sauce off the heat as soon as it starts to thicken 7. Put the sauce aside somewhere warm until you are ready to assemble 8. If the sauce thickens while you are prepping your eggs you can add a tsp of hot water and whisk up again Poached Eggs 1. Bring a saucepan of water to a boil and reduce to medium-low heat 2. Add vinegar to the water 3. Crack one egg at a time into a cup or small bowl and gently pour the whole egg into the pot of water on the stove 4. Set the timer for 3 minutes for soft eggs, 4 minutes for medium and 5 minutes for firm eggs 5. Using a slotted spoon remove the eggs from the pot and place in a bowl or directly onto the ham if you're ready to assemble * adding vinegar to the water isn't necessary but it will help the proteins in the egg to bind and help with the poaching Ham 1. While the eggs are cooking quickly heat up your slices of Black Forest ham in a pan over medium heat Assembling your Eggs Benedict 1. Place 2 multigrain baguette slices on each plate 2. Place 1/2 a slice of Black Forest ham on top of each baguette slice 3. Gently place a poached egg on each one 4. Pour 1/4 of hollandaise sauce over top and add some freshly ground black pepper and serve! Serves 2 Have a great weekend and love good food! ❤️  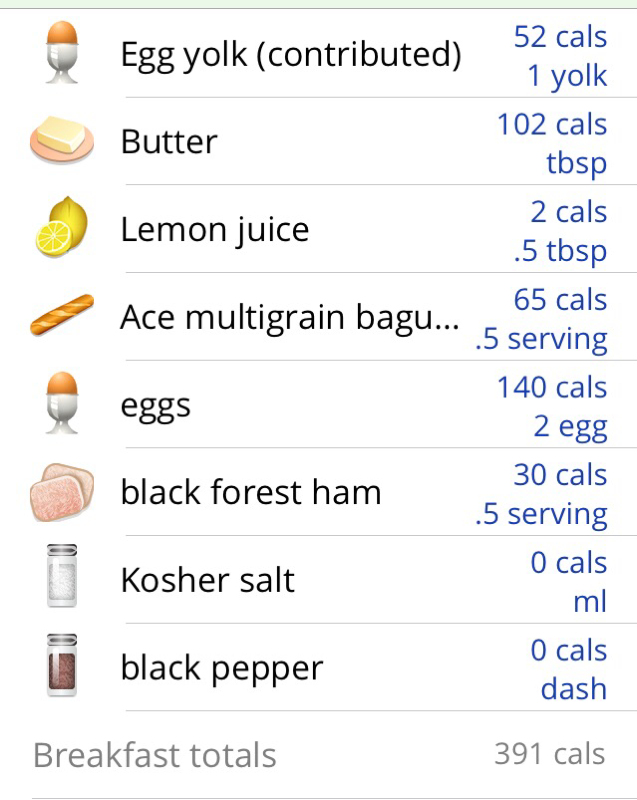 As you can see by the cholesterol count, you don't want to make a habit of having this meal every week! Once in awhile it's fine though, go ahead and enjoy!
 This salad is all about the warm roasted tomatoes and the crumbled feta cheese. Something magical happens when they cozy up together, it's like the feta starts to melt a little and becomes even creamier. I love pairing balsamic vinegar and feta. It's an unexpected combination but the salty brine from the feta pairs so naturally with the sweet rich flavour of the balsamic vinegar. I used spinach and arugula for this salad, they stand up well under a little heat so they're the perfect greens to pair with these warm roasted tomatoes, Sprinkling some walnuts on top finishes it off, adding a crunchy bite. You have to try this salad! The warm tomatoes with the feta, omg - so good! INGREDIENTS - 2 heaping cups of spinach leaves - 2 heaping cups of arugula or baby arugula - 1 tomato - 2 tbsp crumbled feta (about 2 cubes one-square inch) - 2 tbsp walnuts (about 14 halves) - 2 tbsp olive oil - 2 tsp balsamic vinegar - a pinch of kosher salt DIRECTIONS 1. Divide spinach and arugula and put into two bowls 2. Slice tomato into wedges and place in an oven-proof baking dish 3. Turn oven broiler to High and roast tomatoes until softened, approximate 7 minutes and take out of oven when ready 4. While the tomatoes are roasting combine balsamic vinegar, olive oil and salt into a jar with a lid, shake until well combined 5. Place tomatoes on top of salad and drizzle balsamic vinegar over top 6. Compete your salad with crumbled feta and walnuts 7. Enjoy! Have a great day and Love Good Food ❤️ * makes two salads or four starter salads  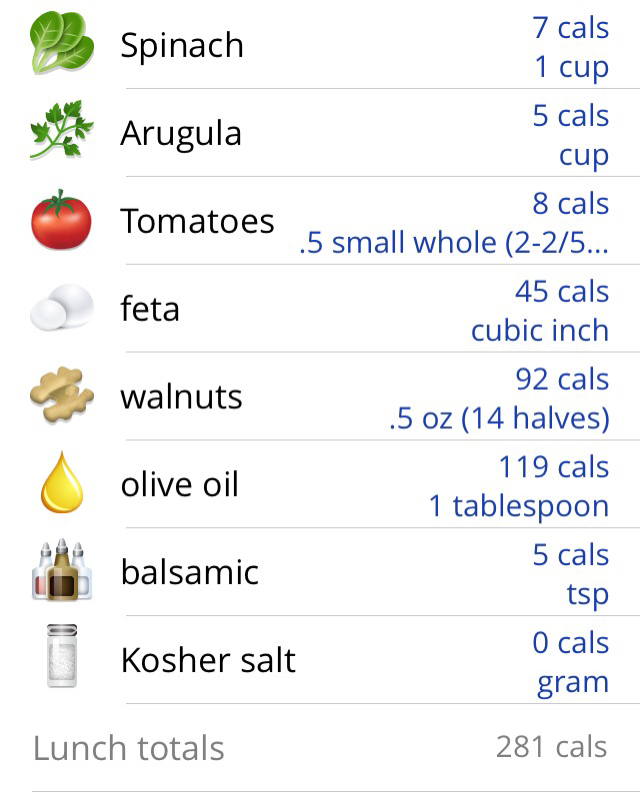 the Nutrition Facts label is for 1 salad, or half the recipe. You can reduce the amount of sodium by not adding salt to the dressing and reduce the overall grams of fat by using less salad dressing and/or putting less walnuts on your salad.
Calorie ratio: 82:9:9 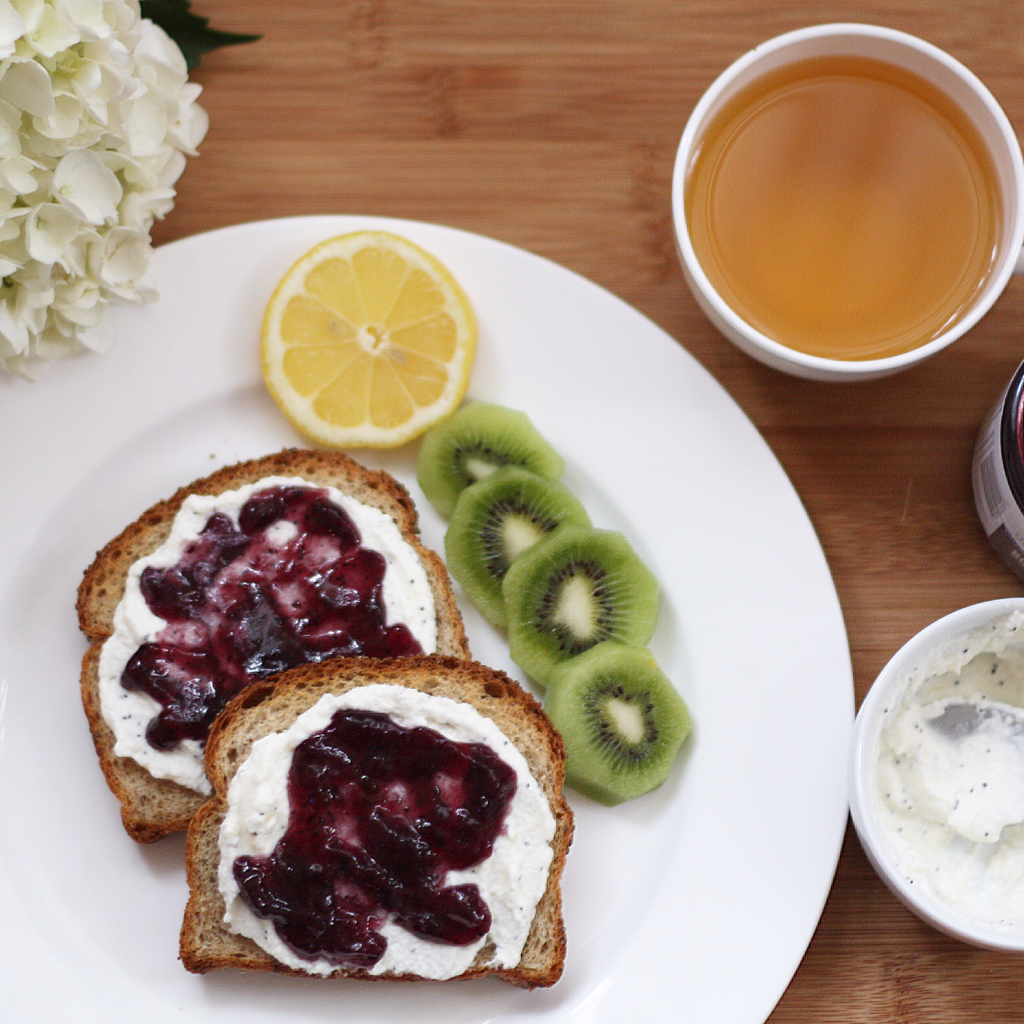 This to me is one of those perfect breakfast meals on a Saturday morning before heading out the door to run your long list of errands. You're not really in a rush to get out the door, but you're also not sticking around the house long enough to whip up a batch of eggs Benedict for the whole family either. Right? This is rather quick and easy to prepare, and honestly, tastes delicious! I found this amazing blueberry spread at the market and it's made by a local orchard in our area. I love it not only because it's tastes amazing but because it's all-natural and without any preservatives, and I also like to support local businesses. I love how blueberries and lemons complement each other beautifully so it was a natural fit to add lemon and poppy seed (of course!) to the ricotta cheese. Have I mentioned before that I love anything with lemon in it? This just works all together and the bright lemony scent will wake you right up! Well, that is if you haven't already had your first cup of coffee.... But anyway, this easy breakfast has the added bonus of being totally well-balanced and nutritious, a great way to start your busy day! INGREDIENTS - 2 slices of whole grain bread, like this chia seed breaf - 1/2 cup of ricotta cheese - 1 tbsp blueberry spread or fruit jam - 1/2 lemon - 1 tsp poppy seeds - kiwi DIRECTIONS 1. Put slices of bread in toaster to toast 2. While the bread is toasting mix the juice of half a lemon and the poppy seeds with the ricotta cheese 3. Peel and slice the kiwi 4. Spread the lemon ricotta and blueberry jam on the toast and serve with kiwi slices Enjoy and Love Good Food! ❤️ Serves 1  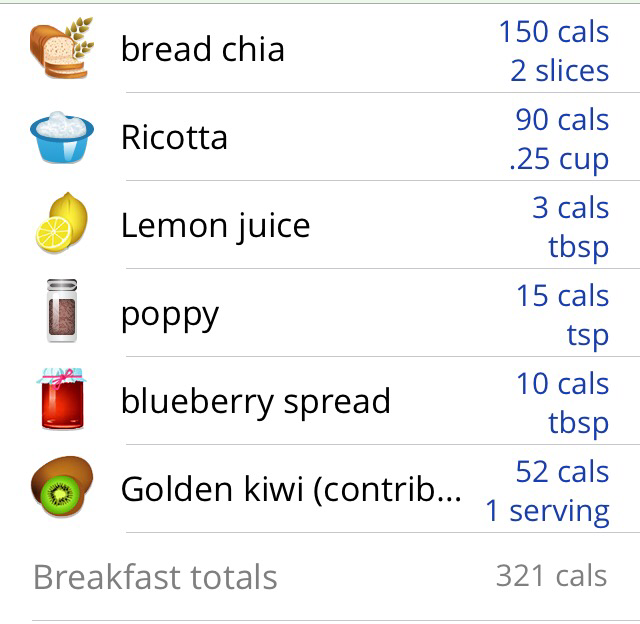 |
AuthorWife, mother and pilot, with a passion for good food. Archives
November 2016
Categories
All

https://foodgawker.com/?author=love+good+food

|
 RSS Feed