 This EVERYday oatmeal is so delicious. It's packed with protein, carbs, and fibre, and vitamins and minerals that will keep you going strong all morning long. The sweetness of the honey and bananas pair naturally with the nutty oats taste and the pumpkin seeds, and the seeds add a nice crunch to this otherwise soft hot cereal. You can make your oatmeal with any kind of oats: steel cut, old fashioned rolled oats or quick oats. I often use quick oats for busy mornings when I need to get out the door on time or when I'm packing my breakfast with me on the road. I like the toothy texture of cooking my quick oats by adding boiling water and covering it until they cook, but you may like it cooked down in a pot on the stove, giving you a porridge texture. Either way they all have the same nutritional value so it's a win-win any way you make your oats. INGREDIENTS - 1/3 cup of quick oats - tbsp flax meal - 2/3 cup boiling water - 1/2 banana sliced - tbsp pumpkin seeds - tsp honey - sprinkle of chia seeds DIRECTIONS 1. Scoop oats and flax meal into a cereal bowl 2. Pour 2/3 cup boiling hot water over oats and cover for 5 minutes to cook 3. When oats are cooked add sliced bananas, pumpkin seeds and drizzle a little honey. Top off with a sprinkle of chia seeds and enjoy! makes 1 serving Have a great day and Love Good Food! ❤️  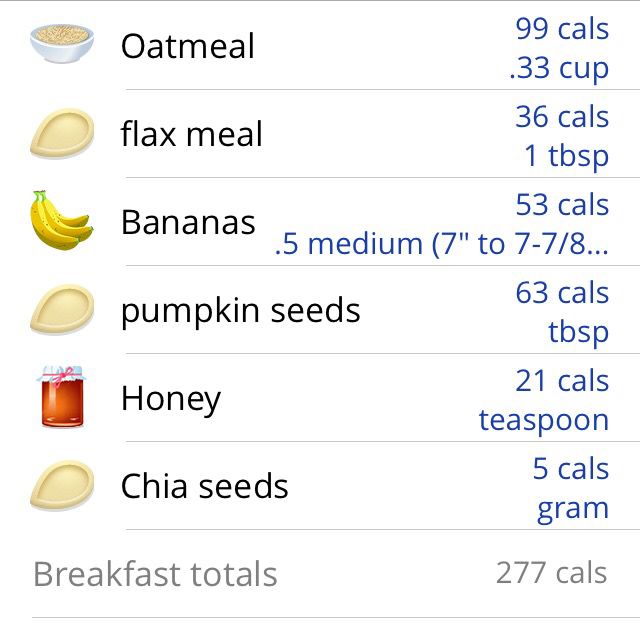
0 Comments
 I love breakfast food. It's what I look forward to most each morning. I love toast and oatmeal and eggs and pancakes, pastries and muffins and smoothies and fruit. There is hardly a breakfast food that I don't love! With everyone so busy these days we need a nutritious breakfast that is quick and easy to make yet that is healthy and delicious. Toast with cheese and jam sounds pretty basic but this toast is far from ordinary and it fits the bill for healthy and nutritious. If you haven't tried ricotta cheese with fruit you should give it a go! It's mild tasting so it pairs well with any flavour. Ricotta is high in protein and low in fat... well as far as cheese goes! Give this delicious toast a try and enjoy a healthy quick breakfast. INGREDIENTS - 2 slices chia bread or any bread of your choice - 4 tbsp ricotta cheese - 1 tbsp strawberry jam - 2 tsp sliced almonds - sprinkle of chia seeds DIRECTIONS 1. Toast bread and spread ricotta cheese and jam 2. Top with almonds and chia seeds and enjoy! Have a great day and Love Good Food! ❤️  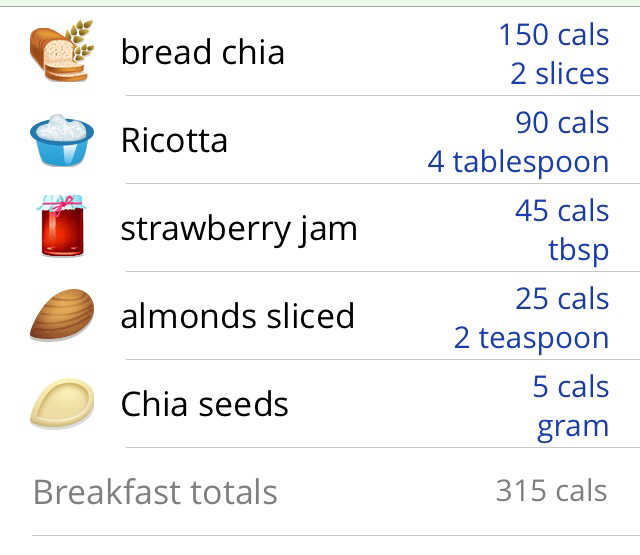  Alright, so this isn't really health food, is it? French fries? Well it can be if you make it low-fat! During my healthy eating (.... and weight-loss) journey I quickly realized that french fries are high in calories and fat. For years I avoided ordering fries as my side opting instead for the soup or salad. No biggie, I love soup and salad anyway, but lately I have been craving a hot serving of fresh french fries. And I'm not talking about the pre-cooked frozen potatoes in a bag from the grocery store that you bake in the oven kind. I'm talking about fresh-cut real potatoes cooked up crispy and hot. Now, because I have two growing boys who love French fries and a husband who is also a fan, I figured it would be worth the investment to get something to make fries at home. There are tons of new household deep fryers on the market but after a little reading I decided that I really didn't want to deal with the oily mess and that the food produced wasn't really low-fat. So then I took a closer look at the T-fal Actifry (and no, this isn't a product review except to tell you that I'm loving it!). The Actifry isn't truly a fryer, it's really more of a super hot air cooker that will cook food and crisp up the outside of most food you put in the machine. This is brilliant for a healthy lifestyle because with only a tablespoon of oil the paddle inside the machine will evenly distribute the oil over the potatoes and deliver a great alternative to fast food and restaurant fries. You don't even have to touch them until they're done. It's been a winner in our home! And at only 257 calories and 7 grams of fat per serving it's a win-win in my books!    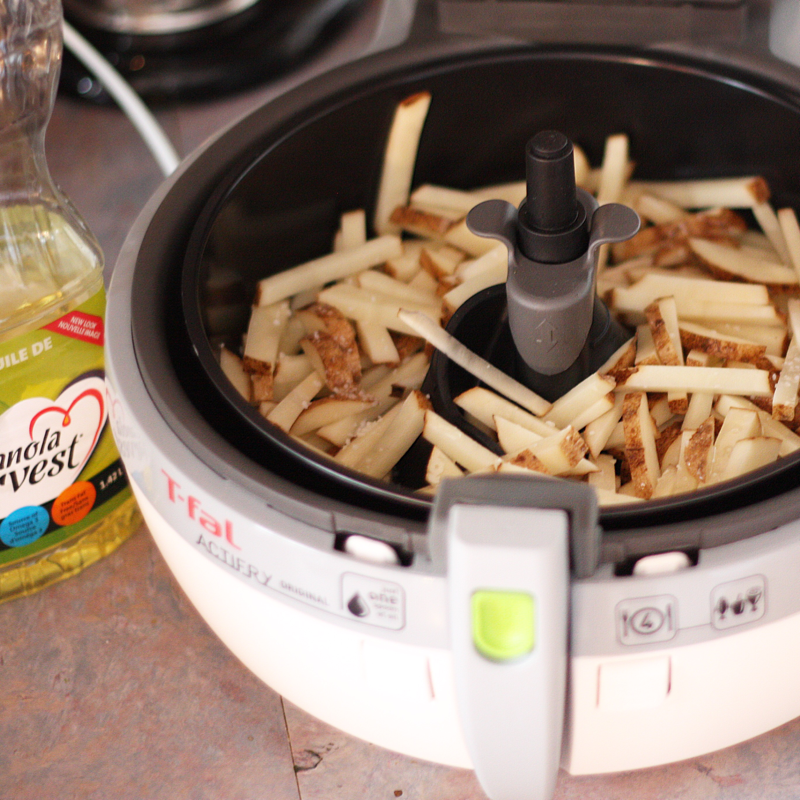 INGREDIENTS - 4 cups of julienned potatoes (approx 1 kg) - 2 tbsp vegetable or canola oil - ketchup or any sauce for dipping DIRECTIONS 1. Slice potatoes as evenly into julienne as you can, this will help the potatoes cook at the same rate 2. Rinse potatoes under cold water to remove any residue and extra potato starch 3. Dry the potatoes as best as you can on a clean tea towel, this will help the oil stick to the potatoes for optimum crisp cooking 4. Put potatoes and vegetable oil into the Actifry and cook as per the directions (approximately 25-30 minutes) 5. Serve with ketchup or other dipping sauce of your choice! Serves 4 cups *tip: don't peel the skin off your potatoes, there's a ton of nutrition and fibre there! Alternatively if you don't have an Actifry you can toss the dried julienned potatoes with vegetable oil in a bowl to coat and cook on a foil-lined baking sheet the oven until cooked and crisp. Pre-heat oven to 425F and cook 20 minutes, flip fries and continue to cook for 20 more minutes. Have a great day and Love Good Food! ❤️  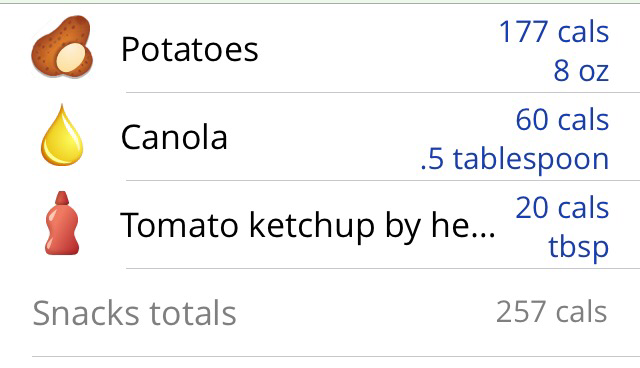 You can see that these homemade fries are a healthier alternative to restaurant and fast-food French fries! 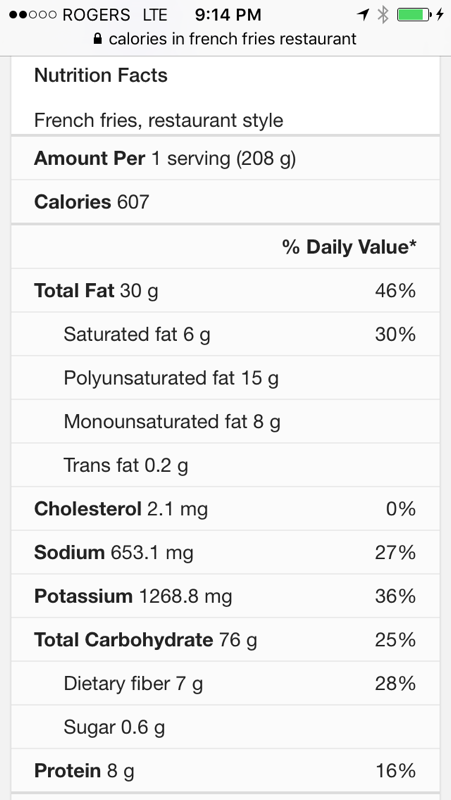 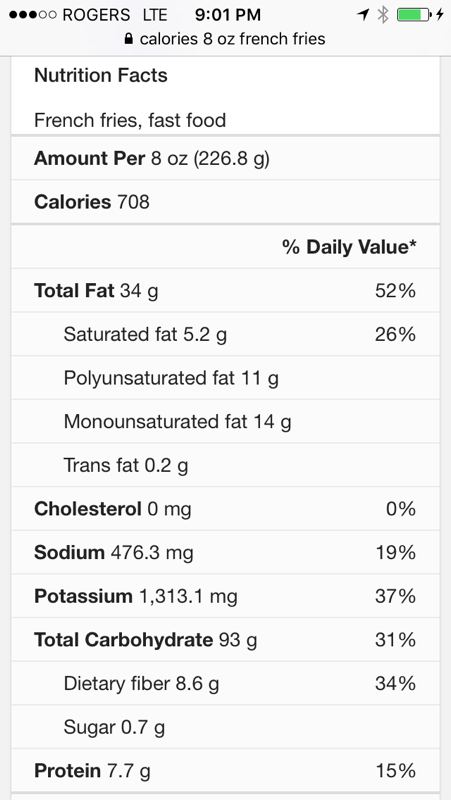  Poached eggs are wonderful. They are made without oil, butter or milk. This is great for people watching every calorie or who are trying to cut back on fat. I love a beautifully made poached egg, it's just perfection. With a little practice you can master the art of making a poached egg. It really isn't difficult even if you don't own a poaching tray. I had a poaching tray at some point when I purchased my first set of good pots and pans, but after moving twice I honestly have no clue where it has gone. No problem though, making poached eggs in a pot of simmering water is super easy. You will agree with me on this, the clean up is a breeze, it's the least messy egg dish to prepare I can think of! INGREDIENTS - 1 egg - 1 tsp vinegar - 3 slices of baguette - tsp olive oil - few pieces of arugula - handful of pea shoots DIRECTIONS 1. Bring a saucepan of water to a boil and reduce to medium-low heat 2. Add vinegar to the water 3. Crack one egg at a time into a cup or small bowl and gently pour the whole egg into the pot of water on medium heat 4. Set the timer for 3 minutes for soft eggs, 4 minutes for medium and 5 minutes for firm eggs 5. Take your baguette slices and drizzle some olive oil over the bread 6. Broil the bread slices in the oven or in a toaster oven to brown the bread, 7. Using a slotted spoon remove the eggs from the pot and place in a bowl or directly onto the ham if you're ready to assemble * adding vinegar to the water isn't necessary but it will help the proteins in the egg white to bind and help with the poaching    A tuna sandwich doesn't have to be laden with gobs of mayonnaise to be delicious. A great way to reduce the fat in your tuna sandwich is to skip the classic tuna salad recipe and make a "deconstructed" tuna salad sandwich instead. This sandwich spreads the mayo and then puts the tuna on the mayonnaise. Top with tomato wedges and zingy banana pepper rings and you'll forget about the traditional tuna salad! INGREDIENTS - 1 can of light tuna fish in water, drained - 4 slices rustic French bread - 2 tbsp mayonnaise - 1/2 cup pea shoots or other greens - 2 small tomatoes cut into wedges - banana pepper rings DIRECTIONS 1. Open and drain canned tuna 2. Spread 1/2 tbsp of mayonnaise on each slice of bread 3. Place some pea shoots on the bread 4. Place approximately 1/4 of the tuna on each slice of bread 5. Top sandwiches with tomato wedges and banana pepper rings and enjoy! Serves 2 Have a great day and Love Good Food! ❤️   * calorie ratio 29:45:26
 Okay, so this isn't really much of a recipe but for anyone stuck in their morning breakfast routine this might shake things up a bit and give you some new ideas. I really love this breakkie - its bright and light and super easy and fast to prepare. Honestly, you could have this any morning before heading out the door, even if you've slept in. I love this breakfast because it is so perfectly balanced, you don't even have to think about it's nutrition. You just know it's healthy and full of good stuff. Fibre, protein, vitamins, carbs.... amazing, and it's delicious! Add some mixed seeds & nuts on the side for an extra pack of protein. Oh, and coffee, be sure to serve it with a hot coffee, or tea... if you don't drink coffee. INGREDIENTS TOAST - slices of rustic hearty bread - 1 tbsp cream cheese - pinch of chia seeds SMOOTHIE - 1 banana - 1 cup of spinach - 1/4 lemon peeled and seeds removed - sprigs of parsley DIRECTIONS TOAST 1. Take sliced bread and toast it. 2. Spread cream cheese on toast and sprinkle chia seeds. 3. Enjoy! (that's it - so simple!) SMOOTHIE 1. Put all ingredients in a blender and blend until smooth 2. Pour into a glass and enjoy! Have a great day and Love Good Food! ❤️ * Nutrition label includes both toast recipe and smoothie recipe as per recipe above  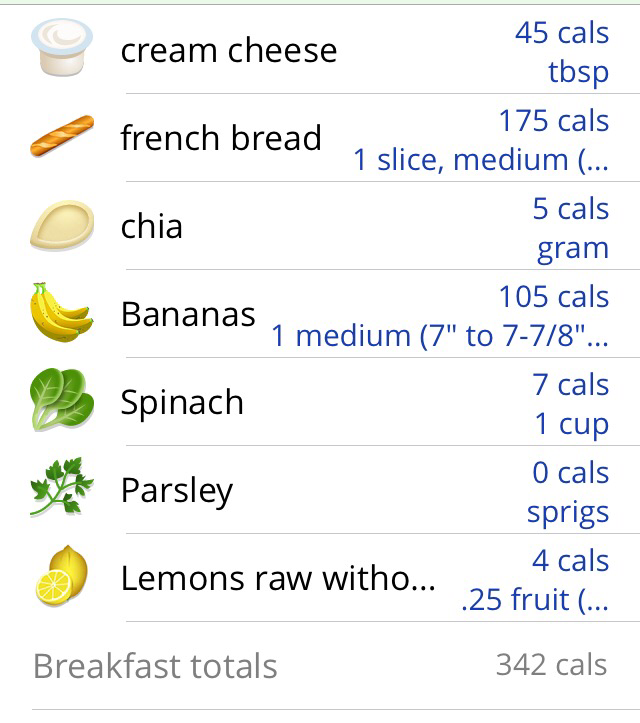  Bright sweet juicy oranges - mmmmm...... so good! I just bought these super juicy Valencia oranges and knew instantly that I had to do something special with them. Valencia oranges are also known as summer oranges and you'll find them from March until November so now is the perfect time to start looking for them! They are bright, sweet and juicy and have a thin rind and few seeds. If you can't find Valencias you can use any variety of orange for this recipe. There are many kinds of oranges to choose from, but your market may only stock one or two varieties at a time so use what you can find. Orange and rosemary pair together beautifully. As soon as you place the rosemary, garlic and orange into the olive oil you will fall in love with the gorgeous sweet and savoury scent. If you aren't eating fish at least once a week you really should introduce white fish into your meal plans. There are so many species of mild white fish that are delicious and will suit even the biggest fusspot in your family. White fish is a great source of protein, is low in fat and supplies a source of essential omega-3 fatty acids. White fish is also high in selenium, B vitamins and iodine, but I won't bore you with all of the finicky health details. All you really need to know is that it's delicious and good for you. INGREDIENTS - 4 fillets, such as tilapia, cod, turbot, haddock, pollock or hake - 1 orange, squeezed and zested - 2 cloves of garlic, crushed or grated - 2 sprigs of rosemary - olive oil - kosher salt - ground black pepper DIRECTIONS 1. prepare fish filets or if using frozen filets thaw and pat dry 2. Season both sides of fish filets with salt and pepper 3. Heat the pan on medium heat and add olive oil 4. When the oil has come up in temperature add the rosemary sprigs, and crushed/grated garlic 5. Grate the orange zest into the pan and squeeze the juice of the orange and stir all the ingredients in the pan 6. Place the filets in the pan and cook approximately 5 minutes per side, or until the fish has a beautiful golden colour on the outside. The fish will be ready when the inside becomes opaque and loses it's translucency and the fish flakes easily with a fork. Don't overcook your fish! Serve with rosemary roasted new potatoes and steamed fresh green beans... or rice and a garden salad. Serves 4 Have a great day and Love Good Food! ❤️ * there is a lot written about the safety of eating fish. Some farmed, freshwater and ocean fish can contain levels of heavy metals and toxins. Be a savvy shopper and do some research on grocery store fish or purchase your fish from a fish market and talk to the fishmonger there about safe fish.  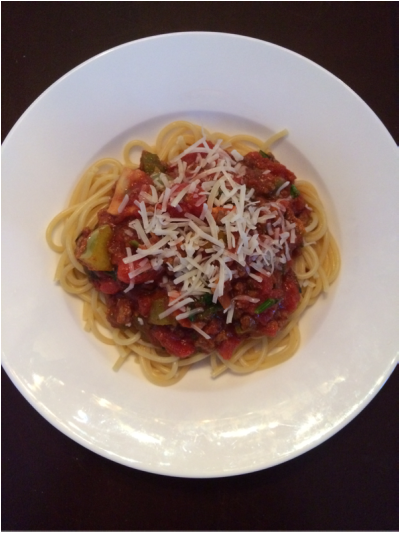 This comfort classic has earned a top spot in our family's regular dinner rotation. It's easy and delicious, just put on some Andrea Bocelli and everyone can feel Italian for the night! My youngest loves to slurp up his long spaghetti noodles, definitely lacking some basic table manners, but hey - kids need to be kids sometimes! And teaching the kids to twirl their spaghetti with a fork and a spoon provides endless opportunities for family fun and laughs. This recipe calls for a few more steps than simply opening up a jar of sauce and heating it up, and it's probably more work than your regular spaghetti sauce, but I promise you that the extra steps will be worth it. You will have a rich delicious sauce with a deep tomatoey flavour and the longer and slower it simmers, the more robust the flavours will become. Spaghetti is a great menu choice for dinner parties or hosting a large family meal. I especially love that you can make this sauce in a crockpot to give you tons of flexibility with your time. We recently hosted 8 adults and 7 kids for dinner so I started making my sauce at lunchtime, put the lid on the crockpot and walked away, giving me tons of time to clean the house, shower, pick up a loaf of fresh bread and get my boys from school. No need to stay close to the stove and watch a pot bubble away at low heat for hours, no way! Let the crockpot take care of that for you, just remember to give it a quick stir once in awhile. INGREDIENTS - 1 large can tomato purée or tomato sauce (not spaghetti sauce) 29 oz, 680 mL - 1 large can crushed tomatoes 28 oz, 796 mL - 1 large can diced Italian tomatoes 28 oz, 796 mL - 1 small can tomato paste 6 oz, 156 mL - 2 lbs, 900g lean ground beef - 1 yellow onion, diced - 1 green bell pepper, chopped - 1 yellow bell pepper, chopped - 2 cups mushrooms, sliced - 1 small bunch spinach, chopped, approximately 1 cup - 2 cloves of garlic crushed and minced or grated - 1 tbsp olive oil - Parmesan cheese - fresh basil leaves - kosher salt - pepper - crushed chilli peppers (optional) DIRECTIONS 1. Brown your ground beef in a frying pan and drain off the fat 2. While the beef is browning open the cans of tomato sauce, crushed tomatoes, diced tomatoes and tomato paste. Pour them into your crockpot or into a large pot 3. Add ground beef to your sauce and add kosher salt and pepper to taste 4. Take your frying pan, you don't even need to wash it, just discard the beef fat, heat the pan, add olive oil and sauté the onion, peppers, mushrooms and garlic - but not the spinach! save the spinach for later 5. Add the vegetables to your tomato sauce 6. Deglaze your frying pan with a splash of wine, water or some tomato sauce from the pot and add to your sauce - there's a lot of great favour in the pan 7. Taste your sauce again and add salt and pepper as required 8. Set your crockpot to Low for three hours or simmer on low heat on the stove top for at least 20 minutes. The longer it simmers the more the flavours will meld together 9. Before you're ready to serve your meal, finely chop the fresh spinach and stir into the sauce (at the same time you boil the water for your pasta) 10. If your sauce has been simmering for hours it may reduce down and become thicker than you would like, just boil some fresh water and add it to the sauce 11. Serve sauce over spaghetti noodles or you choice of pasta with fresh basil, parmesan cheese, ground black pepper and crushed chilli peppers for those who like it spicy! Serve with a fresh salad and a loaf of rustic bread & butter! * sautéing your vegetables instead of popping fresh vegetables into your spaghetti sauce browns the vegetables giving them depth as you layer the flavours in the sauce ** I add the fresh spinach at the end because it's so delicate. It will wilt down in the hot sauce yet maintain its beautiful green colour. If you add it early on in the cooking process it's not a big deal - but it will turn a dark green colour Makes approximately 20 cups of sauce Have a great day and Love Good Food! ❤️ Nutrition values for 1 cup of spaghetti sauce prepared with a generous 1.5 tbsp kosher salt in the pot of sauce. Cooking with less salt will lower the amount of sodium per serving.  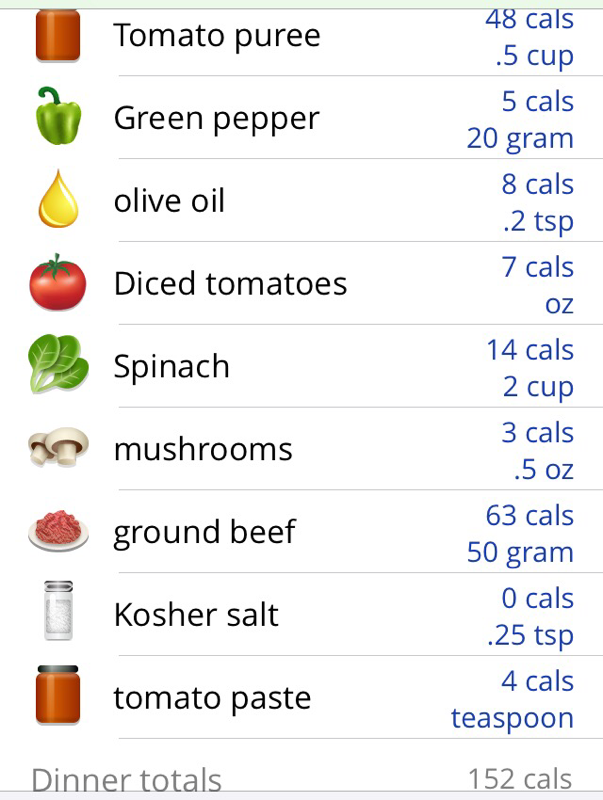  Do you tend to forget about your leftovers and end up throwing them out? Or maybe you're lucky and have someone in your home that you can count on to scrounge into the deepest depths of your fridge to eat them up - lucky you! As you can guess by a peak into my fridge that when I go away for a few days fresh food and leftovers won't get eaten without a little help from me. These little fridge notes have been a boon for my sanity - most of the food actually gets eaten now! I have to tell you, at LOVE GOOD FOOD, I hate throwing food away. I don't know if it's because I was raised to "eat everything on your plate" or if it was the words "there are starving children in Africa" echoing in my head, but I cringe and feel guilt anytime I throw food away. You might be surprised to hear that an estimated 30% of our food in North America is thrown in the garbage. Seriously. Money right in the trash! The reality is that there are real challenges to produce enough food for the number of people who inhabit our planet and our global population is only increasing each year. Food should be respected and enjoyed, not carelessly discarded. Chances are you put your heart and soul into preparing your meals, so why would you want to throw any of it away? If you find that you and your family are throwing away a lot of your hard-earned food, try some of these tips to prevent throwing away good food. 1. Try to keep your leftovers and the fresh perishable food at the front of the fridge. As soon as these items reach the back of the fridge it's hard to see them - out of sight, out of mind! So put them up front and centre where you will see them. Label them while you're at it - it helps to be reminded what's there! 2. If you have leftovers that you don't plan on gobbling up in the next two days pop it in a freezer safe container and put it in your freezer for another time. It's helpful to label these containers too with the date and what's inside. 3. If you plan on using leftovers for lunches pack them in lunch size containers so in the morning they're already packaged and ready to pop in your bag. 4. If you have fruit that are starting to get close to their prime, like bananas, strawberries, mangos, or berries, chop them up and toss them in the freezer, they're great for making smoothies. 5. If you have vegetables that are starting to become less than fresh, use them in a soup, stew, or a spaghetti sauce. 6. Chop up vegetables and have them handy for snacking on. This is one of my family's biggest challenges, when they want a snack they want it now, and if it isn't convenient they won't reach for it. 7. If you find a couple of different containers of leftovers in your fridge have a Leftover Night where you heat them all up and serve them buffet style. Everyone can choose what they want and hopefully you'll be left with only empty dishes. 8. If you only have a couple cups of leftover spaghetti sauce you can stretch it out to feed the whole family by adding a large can of crushed tomatoes while you heat it up on the stove top. Or cook up a small portion of noodles and serve spaghetti as primo like the Italians before your secondo main dish. 9. Make a point to go through your fridge regularly and poke around into the back of the shelves to see what you have hiding back there. Hopefully you can avoid throwing away food by being more aware of what's actually in your fridge. 10. Before you go shopping take a quick inventory of what you have and what you need. If you already have a big bag of lettuce there's no point buying another big bag, even if it's on sale... unless you promise to eat a salad everyday! We hope these tips help! Bon appetit and LOVE GOOD FOOD.
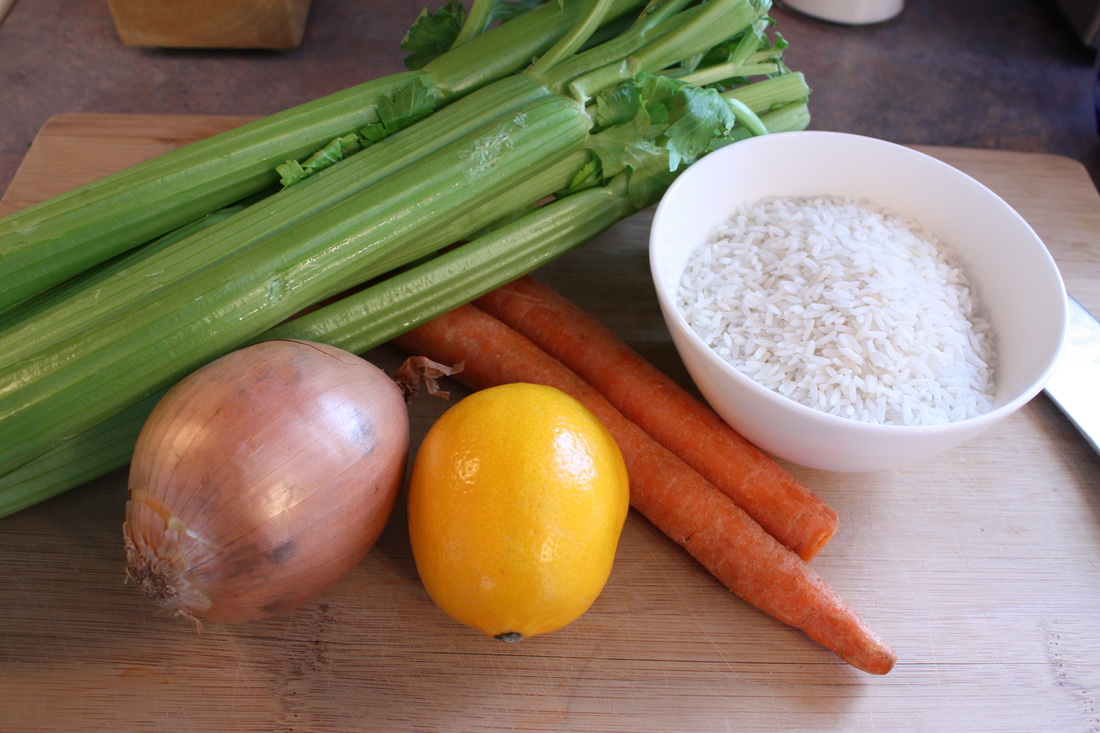
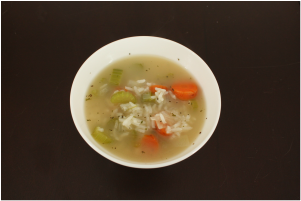
With the sun shining brighter and the fresh scent of spring in the air, it's time to say good-bye to Old Man Winter and trade in our hearty soups for something a little lighter. Spring is the perfect time to enjoy a hot bowl of Lemon Chicken Rice soup and for me, there's nothing that screams sunshine more than the bright taste of lemon. This recipe is inspired by a soup that a family run restaurant in our neighbourhood used to serve. We used to go with friends to the Park Tower regularly so we were crushed when they closed their doors forever. They served burgers and Greek homestyle food and their Lemon Chicken Rice soup was a crowd favourite. This recipe is a nod to Bill & Kathy, the owners, of the old Park Tower Restaurant. INGREDIENTS - 8 cups of homemade chicken broth or two 32 oz/900 mL cartons of low-sodium chicken broth - 1 cup uncooked rice - 1/2 cup chopped cooked chicken (optional) - 2 carrots chopped - 4 celery sticks chopped - 1/2 onion diced - 1 or 2 lemons - kosher salt - pepper - 2 tsp dried basil - 2 tsp dried parsley DIRECTIONS 1. Prepare your rice as per the package directions 2. Pour chicken broth into a large pot and turn the heat to high 3. Chop vegetables and add to chicken broth 4. Add salt and pepper (to taste), basil and parsley to the soup 5. When the soup begins to boil turn the heat down to medium and cook until the vegetables are tender but not mushy and then take off the heat 6. When the rice is cooked, add the rice and the chopped chicken to the soup 7. Squeeze the juice of one or two lemons into the soup and stir * sometimes lemons aren't super juicy so you may need an extra lemon if one isn't giving your soup a lemony flavour ** you can use any rice of your choice for this soup. Basmati rice tends to keep its shape better in soup whereas long-grain white rice will start to curl and the starch comes out more. A bit of wild rice will give you a rustic touch! Serves 12 Have a great day and Love Good Food! ❤️   Smoothies are a great way to get your 5-10 servings of fruit and vegetables in each day! They're quick and easy and transportable. Blend it up and pour it in a travel mug and you can have your breakfast on your morning commute! Green smoothies are amazing for kids too. Don't assume your picky eater won't like it, they'll be intrigued by the bright beautiful colour and hopefully won't even realize they're sipping spinach and other greens that you may have trouble getting them to eat at dinner time. When my son was 3 years old his favourite colour was green so I had no problem getting him to love green smoothies - he still asks for them every morning! * tip: don't start with too many greens for your picky little eater, if it tastes like banana you'll have a much better chance of getting them to love this green delight! also don't make it too thick, the thinner it is the easier it will be to drink also helping your child to love smoothies One green smoothie with one large banana, 1/2 cup of spinach, and parsley counts as three servings of fruit and vegetables! Not to mention this is a great way to start off your day. Depending on how sweet you like your smoothies you can use water, juice, milk or yogurt as your base. When I'm using sweet fruit like mango, I prefer water as a base but I'll often use apple juice when I'm just tossing in a banana and spinach. If you want more protein you can use milk, soy milk or yogurt as your base. The choice is yours! Green Mango Smoothie INGREDIENTS 1 banana 1 cup spinach 1/4 mango peeled 1/2 cup water DIRECTIONS 1. Add all ingredients into a blender and blend. (For a thicker smoothie add less water) 2. Pour into a glass and enjoy! Smoothies are a great way to use up any produce in your fridge that is getting a little past it's prime. Strawberries starting to get soft? Bananas starting to spot? Toss those berries in a freezer bag or container and use them for your smoothie instead of tossing rotten fruit in the garbage!   Being a pilot, you can imagine that I spend a LOT of time in airports and it can be a challenge to find fresh and wholesome fast food in a sea of food courts with burgers & fries, greasy pizza, and coffee shops laden with high fat muffins, sugary pastries and decadent confections.
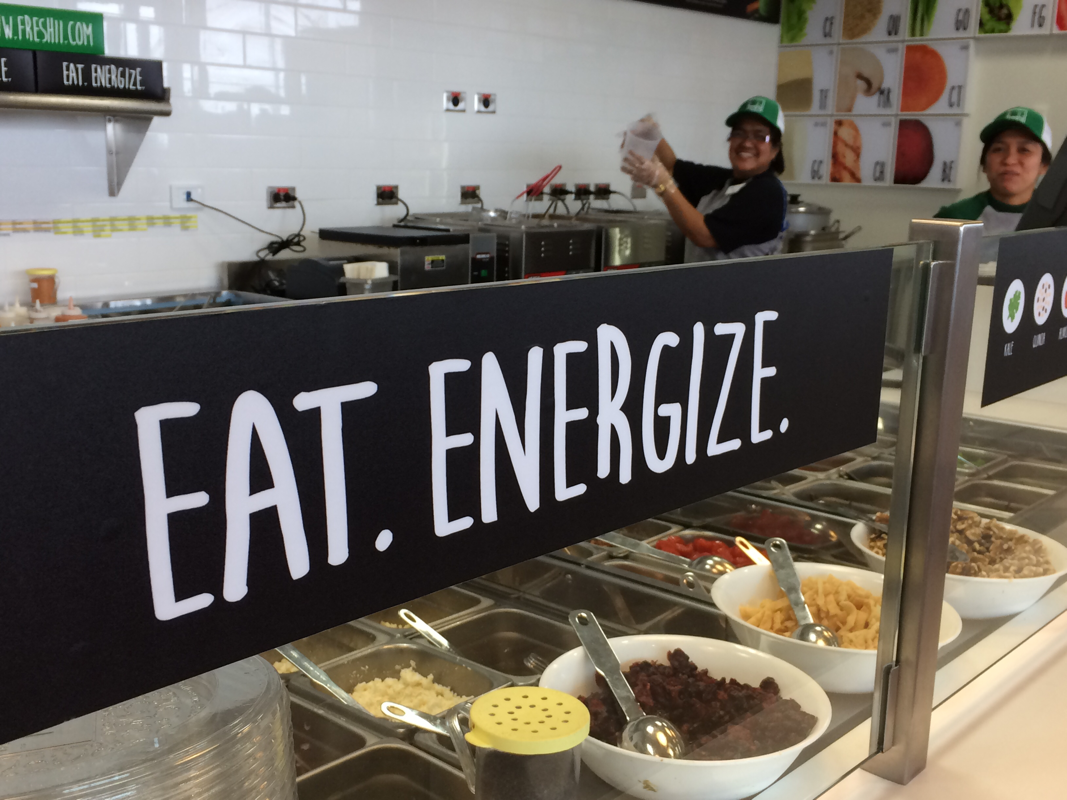
Lo and behold, Freshii entered the scene! This is my absolute favourite fast food joint! If you come across a Freshii you have to check it out (they're even opening up locations at select Target stores!). They have fresh, made-to-order salads, wraps, soups, burritos, bowls, juices & smoothies, frozen yogurt and breakfast items. Their motto is "Eat. Energize." and they're focused on providing fresh and nutritious meal choices that energize people on the go. Nice! - this is exactly what I crave when I'm on the road and their philosophy is aligned perfectly with my own food philosophy. Today I ordered one of their delicious Bowls, the Buddha's Satay. This bowl is choc-full of rice noodles, crispy wontons, carrots, broccoli, cabbage, green onions and spicy peanut sauce and I ordered it with chicken, which by the way, is hormone free. Mmm.... delish! Another favourite of mine is the Spicy Lemongrass Soup. **WARNING** This soup comes in a bucket, seriously - there's enough soup in here to feed a family! So what's in this vat of spicy goodness? Did I mention that it's spicy?? The base is spicy lemongrass broth, rice noodles, cabbage, carrots, tomatoes, mushrooms and cilantro. I absolutely love that it's topped off with cilantro, but if you're like my husband, he absolutely dislikes cilantro, but since they make each bowl to order you can ask them to skip any of the ingredients that you don't like. So if you see a Freshii in your area be sure to stop and check it out, It may even inspire you to make food like this at home! https://www.freshii.com/ca/menu
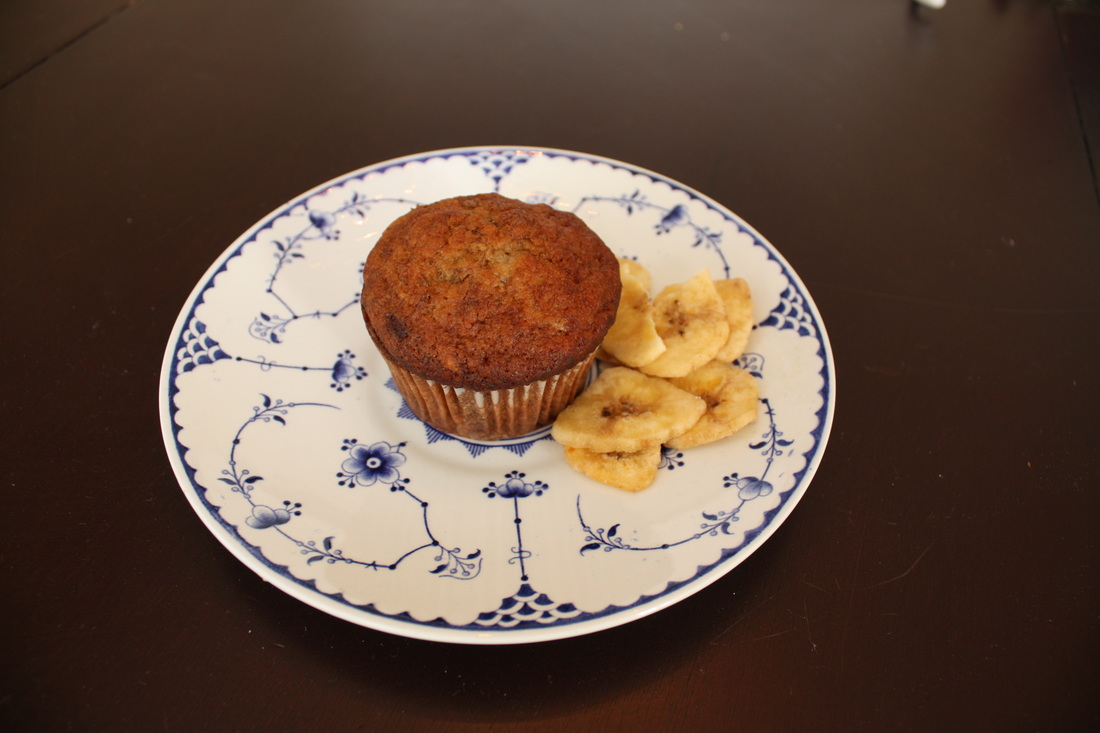
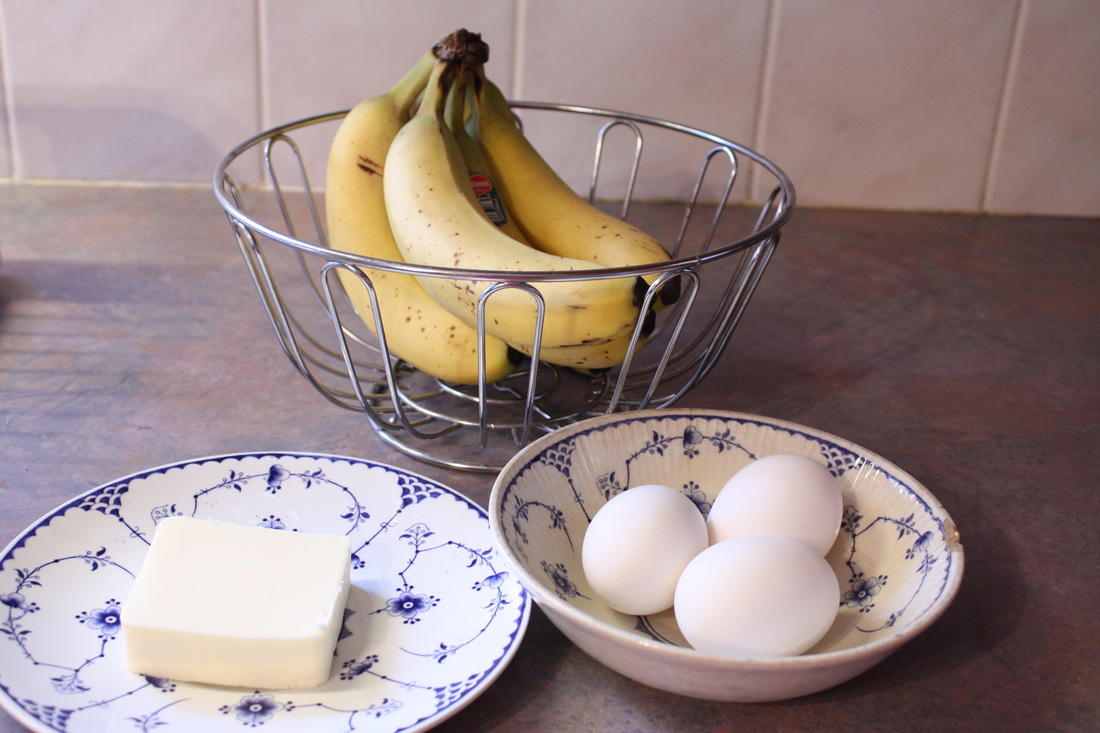
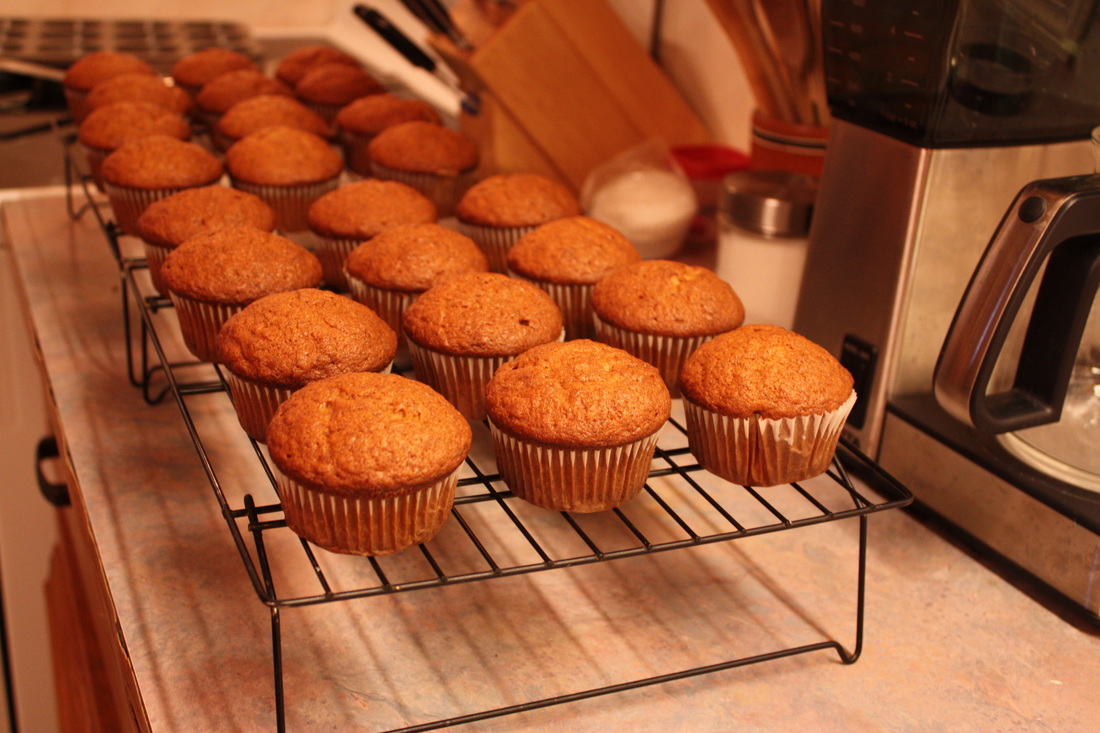
Even though I don't bake very often, this is BY FAR the recipe that friends and family ask me for the most. It makes a delicious dark banana bread when you use very overripe bananas or bananas thawed from the freezer, or a lighter tasting golden coloured banana bread if you use bananas that are just spotting and browning. Either way this is the perfect banana bread to take along to Aunt Margaret's for Tea, to baby showers and wedding showers, as a Thank You for someone special or just to enjoy at home with your morning coffee. I am one of those people who like bananas before they start to spot so I toss my bananas in the freezer as soon as they start to brown. You can pretty much count on me always having bananas in my freezer! My favourite is the dark rich banana bread so I almost always make it this way but you can also use the ripe bananas off your counter, or sometimes you can find the old bananas for a bargain at the grocery store. This recipe works great as a loaf or muffins, either way you can't go wrong!
INGREDIENTS 3 or 4 ripe bananas, mashed 1/3 cup very soft butter 1 cup sugar (can be reduced to 1/2 cup) 1 egg at room temperature 1 tsp vanilla 1 tsp baking soda pinch of salt 1 1/2 cups of flour DIRECTIONS 1. Preheat the oven to 350F and lightly grease 9"x5" loaf pan or use a muffin tin 2. Mix butter and sugar until blended and creamy 3. Add sugar, egg, vanilla and mashed bananas and mix well 4. Mix dry ingredients (baking soda, salt and flour) in a separate bowl 5. Combine dry ingredients with the banana mixture and mix until dry ingredients are wet, don't over mix 6. Pour batter into loaf pan or muffin pan 7. Bake loaf for 60 minutes/muffins for 30 minutes and test for doneness. Banana bread is ready when toothpick inserted comes out clean 8. Let banana bread sit for 5 minutes then turn onto wire rack to cool * Banana bread can be a recipe that is difficult to execute well. Since bananas come in all different sizes it can be tricky to get the right moisture consistency. You are looking for batter that is not runny and not stiff. If your batter is too runny add a bit more flour, if it's too dry add a few tablespoons of milk. ** if you are using previously frozen bananas thaw in advance and make sure they are at room temperature before mixing Makes one loaf or 12 muffins  I had the most amazing vacation in Jamaica and I was blown away by how fabulous the food was at the Hyatt Ziva. We arrived late afternoon and headed over to the Barefoot Jerkz Chicken Hut for a snack. The jerk chicken was absolutely delish. The chicken was cooked right there on the beach grill and was moist and juicy and the sauce was tangy with a slow heat. Later that night we dined on the most perfectly cooked and seasoned shrimp and snapper. I love to taste the local food when I'm traveling so I was excited to see ackee & saltfish, callaloo (which are sautéed greens) and grilled polenta - all traditional food, at the breakfast buffet. Jamaican food is influenced by the various cultures who live here (African, Indian, British, French, Spanish, Chinese) and is rich in flavours and spices. I couldn't help but try it all! Jerk seasoning traditionally has allspice and gets its heat from the scotch bonnet pepper. Variations can include anything from cloves, cinnamon, garlic and brown sugar, but the locals will tell you that Scotchies makes the best jerk chicken around. The resort also had a Brazillian restaurant that was an experience in itself. The waiter arrived and gave everyone at the table two cards, one that indicates to the servers that you would like another serving and one that tells them that you're okay for now. Then he explained how the courses work. They serve the side dishes family style on the table along with sauces for the meat and then the various meat dishes are served off skewers. The sides were Brazilian style black beans, rice and fried polenta and for sauces we had chimichurri and garlic aïoli. We enjoyed steak, grilled chicken, jerk chicken wings, saussage, lamb, and Black Forest ham. There was such an impressive selection of restaurants at our resort that we didn't have time to experience them all during our weekend getaway but I will quickly tell you about our favourite meal at Di Rosa, their Italian restaurant. We didn't have reservations but they were able to accommodate us on a busy night at the bar. It turned out that these were the best seats in the house! The large pizza oven was right in front of us where we watched the two pizza chefs stoke the fire wood and prepare gorgeous hand tossed pizzas one after another. We devoured an assortment of antipasti, our main pasta dishes and a decadent dessert. The pizza chefs playfully chided us for not ordering a pizza, so we ordered a Greek pizza to go - it was a perfect midnight snack! A trip to Jamaica wouldn't be complete for me if I didn't have a Jamaican beef pattie. On the last day there were beef patties at the lunch buffet, awesome - they didn't disappoint and they were spicy hot! The perfect way to end our vacation. Ya Mon! 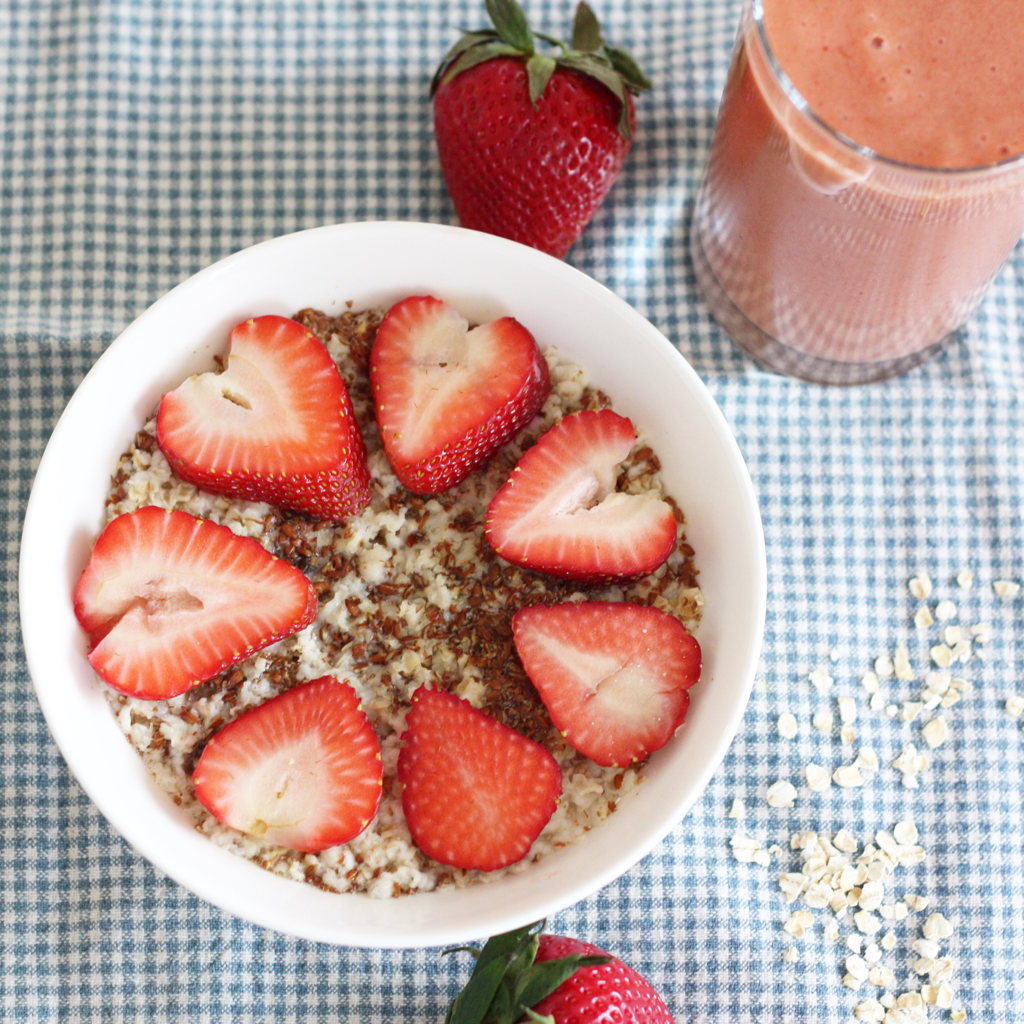 We call this Everyday oatmeal in our house because we eat this almost every day. It's quick and easy and full of good stuff. It's loaded with fibre, carbs, protein and with the nuts in there, a bit of healthy fat - it's a perfectly balanced breakfast meal, You can even take this oatmeal with you and make it anywhere you can get boiling water. Just pop the oats and good stuff into a container and off you go! I take this with me to work on the airplane all of the time. And starting off your day with a great cereal like this will kick start your day and keep you going. Bonus - you can make this for the whole family for $1! It's healthy, delicious and easy on the wallet! INGREDIENTS 1/3 cup quick oats 1 Tbsp flax meal Thompson raisins Golden raisins Dried cranberries Walnuts Slivered almonds Pecans DIRECTIONS Put all of the ingredients in a bowl (container) and add 2/3 cup of boiling water and cover. The oatmeal will be ready in less than 5 minutes, uncover and enjoy! Top with sliced fruit like these strawberries or bananas or fresh berries, whatever you have on hand! You can experiment with the amount of water you add, some people like their oatmeal thick and some like it a little thin. Quick oats are perfect for everyday oatmeal because you don't have to cook them on the stove top. Bonus - no sticky pot to clean! Now, I'm not knocking your Granny's porridge but these quick oats cooked this way won't leave you with gooey oats, they're actually a bit toothy in the way that pasta is al dente. But if you prefer the texture of porridge just pop it in the microwave as per the directions on the package. This oatmeal is great for busy mornings and breakfast on the go! Oh - and those of you with a sweet tooth, you'll notice that I don't add any sugar, I find that the raisins and cranberries add the perfect amount of sweetness, but you can add a tsp of brown sugar if you'd like!  |
AuthorWife, mother and pilot, with a passion for good food. Archives
November 2016
Categories
All

https://foodgawker.com/?author=love+good+food

|


 RSS Feed